Caproni Ca 311 Heavy Hitters Group Build

Ad: This forum contains affiliate links to products on Amazon and eBay. More information in Terms and rules

Dam, I feel for you on that. Still looking pretty sharp!

Thanks David. Seems to be a rash of these problems going around.

:lol: And THIS close to the deadline (extended even). Man I could JUST scream!

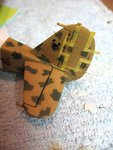
Here's the problem. It's that last set of windows - you can see the upper one empty, the second one below it has the L-shaped window piece with the tape stuck to it, there's a narrow one below THAT and then the fourth one to the right that's extends under the tape.

What you can't see is that inside the upper part of the pop-down machine gun position is right behind those windows which makes it extremely difficult to rotate that clear piece back into position.

I wonder if MAYBE I could pop out the window on the top of the fuselage and access it that way. Then the problem is how to get that upper window back into position. :lol: Anyone have any ideas? Suggestions? An extra bottle of single malt lying around?
 

Attachments

  • IMG_0603v1.JPG
    IMG_0603v1.JPG
    49 KB · Views: 139
You'll come over it dwight! I feel you though, im going mind crazy over trying to get my bird done. Literally been working since 6:30am.. :shock:
 
You'll come over it dwight! I feel you though, im going mind crazy over trying to get my bird done. Literally been working since 6:30am.. :shock:

Thanks Corey. :) Hope you get yours done.

I think you got up about 15 minutes after me. :lol: I had planned to stay up to midnight tonight and then up early tomorrow. I was JUST going to get it done under the wire, but it's unlikely now with this mishap. In fact, I'm going to shut things down for tonight in about 2 minutes and just relax. If I try fixing it now, I'll just make a hash of it.

What really frosts me is that I tried to make extra sure that those windows were in securely! I knew if they popped in i was toast - so why that one decided to spring free just beats the hell out of me. :evil:
 
Dwight, are the four windows moulded as part of one clear componet then, or seperately?

A tricky repair, but maybe (if possible) you could remove the upper section of the canopy (or the whole thing), and access the windows via the cockpit, using an ice cream stick or similar with double sided tape on the end to grab and hold the windows in place while gluing? Would be easier to refit the canopy afterwards than a popped out top window...

It's moulded as one piece, slightly L-shaped but with an extra piece in the inside corner of the L which is what makes it tough to get out. It's definitely not narrow enough to take out thru the sides, and not narrow enough to take out to the top window either.

I did think about removing the front canopy, but it wouldn't work. The entire bomb rack system is in the way between the front of plane and the windows. It MIGHT get thru the two racks but won't get past the turret or seats.

I decided to pop out the window in the top of the fuselage and try to access the side panel that way. Trying to get the panel through the top failed but at least I can fiddle wiith the side panel from that access.

This is going to be a byatch to get back into place. :evil:

If I could get a decent grip on it, I would consider cutting it down into separate pieces and then re-installing them that way. The coffee stirrer stick idea is a great one. I'll have to keep that in mind.

Thanks Evan. You did give me a couple of ideas! :) Now where is that bottle of single malt!? :lol: :lol: :lol:
 
Last edited:
Could you just use something like Krystal Klear (sp?) and make your own windows in the frames?

Thanks for the tip David. :)

I definitely could use it for the two lower windows (they're small enough) but not sure if the two upper windows are too big for that. I've never used it before so I don't know if there is a practical size limit for this sort of thing. So I might still have to figure out a way to separate the two lower windows from the one big piece.

Unfortunately I don't have any on hand and the local hobby shop doesn't carry it. I just added it to my shopping list though. :)

Edit: I'm taking a break for a bit. The wife wants to build a snowman so I've been enlisted. :lol:
 
What a bar steward of a thing to happen! Sounds like it's going to be a mix of success and frustration. I think if it was me, and the windows can't be re-set, I'd look at a different approach. It might be possible to 'capture' the windows, but being able to seat and cement them from the inside sounds bl**dy difficult at least, if not impossible, without major surgery.
This is how i'd go about it.
Try to retrieve the windows, but forget about re-locating them. Use the windows, and the apertures, to cut patterns for new ones. Cut new windows from thin, clear sheet, to fit into the apertures from the outside.
When fitting, mount the windows individually onto the end of a cocktail stick, or, better, a cut-down wooden BBQ skewer, using a blob of Blue Tac or similar. Attach a short length of Tamiya masking tape to the top of each window pain.
With each window in place, run a bead of PVA around the edge, in the frame (same stuff as Kristal Klear basically), and use the tape to hold the top in place until the PVA sets. Wipe-off any excess PVA straight away, using a wet finger tip.
When set (about 20 minutes), remove the tape, invert the model, and run liquid cement around the PVA-free top area and, when set, seal with another thin bead of PVA, wiping-off as before.
Touch-up any paintwork and clear coats as required.
It's fiddly, you'll invent a lot of new curses, but it'll work. I had to do it with a B17, and the end result looked better than the kit windows.
 
Thanks DB. :)

What a bar steward of a thing to happen! Sounds like it's going to be a mix of success and frustration.


Thanks for the suggestions Terry. :) Yeah needless to say I was NOT happy. It was going to be close but I thought I would get this one in under the wire.

Oh I gave the curses a real workout, trust me. I think I invented several new ones in the process. My wife heard me cursing all the way downstairs when it happened but didn't ask me until this afternoon what had happened. :lol: She KNEW it wasn't good though. She said one of the cats went running for cover under the dining room table as well. :lol: "Oh Oh, Daddy's pissed off - better run and hide."


I'm still trying to see if I can retrieve the windows. So far, it's NOT looking good. The only way to get them out (aside from popping the front canopy off and trying to jiggle the window thru the bomb racks) is to either (1) take them out as one piece thru the top window or cut them down to size and take them out the same way or (2) split the frackin' fuselage and take them out that way. Option 2 is obviously the LAST resort.

Fabricating new windows for the upper slots and/or using Krystal Klear for the two smaller lower windows sound like my best options if the retrieval fails. THe only other thing I can think of would be to find a REALLY cheap version of the kit and scrap it just for a new set of side windows.
 
Bummer Dwight. Got me stumped. I think you should enter the build anyway as is and come back to it after. Marvelous job on the rest of it.

Maybe a little diorama with a couple of ground crew replacing a shot out window?
 
Bummer Dwight. Got me stumped. I think you should enter the build anyway as is and come back to it after. Marvelous job on the rest of it.

Maybe a little diorama with a couple of ground crew replacing a shot out window?

Thanks Andy. :) Intersting idea on the diorama.


We need u to get a finished thread up Dwight, is everything else done on her for pics???

Missing windows is not the worse entry we've ever had man, and u'll still qualify for the badge...

Dan, it still needs the decals for the tail markings (which I can do today). Plus I need to matt coat it and remove the masks on the main canopy. I could have finished all of that yesterday but I thought that the windows would make it a non-starter for judging. Sent you a pm. :)

Edit: At last a little GOOD news. I managed to get the window pane turned around - don't ask me HOW, but somehow it managed to get turned around 180 degrees so it was facing the wrong way. After almost two hours of trying to get that little bugger turned around, I now have a grip on it with a pair of small forceps in approximately the right position. I'm cleaning off paint and the old glue from the clear part first, then the old glue from the interior of the fuselage frame before I attempt to reglue the windows. The bad news is that in the process I manged to bang the rudder enough that it has to be reglued. :lol: That's a MINOR problem though. So far I've avoided doing any damage to the camo job.

Almost lunch time here, so it's time for a break. :)
 
Last edited:
Dwight she is looking Sharp! My man .The window?? It might sound crazy but could you drill a small hole on the opposite side of the fuse and put a rod in for pressure against the glass then apply the liquid cement?Patch the hole with putty and touch it up?Like I said might be a bad idea but it might work if there is not alot in the fuse to get in the way.Cheers Kevin
 
Dwight she is looking Sharp! My man .The window?? It might sound crazy but could you drill a small hole on the opposite side of the fuse and put a rod in for pressure against the glass then apply the liquid cement?Patch the hole with putty and touch it up?Like I said might be a bad idea but it might work if there is not alot in the fuse to get in the way.Cheers Kevin

Thanks Kevin. :)

That's not a bad idea at all and I actually considered that. I also thought of doing something similiar but drilling a very tiny hole in the glass itself, snaking a piece of thread through, tying off one end in a knot and pulling it tight. Then after it sets up, cut the thread and patch the hole with Micro Krystal Klear. :) I may do something like that for the top window now that it is out too. :)
 
Thought I would be finished by today but I ran into a snag. One of the tail cross decals tore badly while I was putting it on, so I am going to have to airbrush the tail crosses on as I don't have spares and the orignal kit decals are damaged and unusable. The first pic below shows the outline of the port side tail cross partially off in preparation for airbrushing. I'll need to do additional masking to protect the rest of the paint job making sure I do not snag that cute little scorpion marking with the tape.

In the first pic you can see a remnant of the tail cross decal (red arrow). I used that to create a paper guide to make sure I got the masking strips squared off and at the right separation (second pic). I'm still masking off the starboard size. Making sure I get everything aligned exactly is taking some time.

For the windows that popped out, I decided to use Evan's suggestion and access them through the upper fuselage window. Once the side panel is back and place and secured, I need to reattach the upper window. To restick that window back into place, I prepped it with a coat of future and will carefully CA it back into place. I'll use a small ball of Blue-Tac stuck to a small stick and then insert it thru the hole and pull it up into place. Should work (hopefully). Right now the side panel is being held by a set of forceps. (last pic) - unfortunately that window panel will NOT come out thru that opening no matter it is twisted or turned.
 

Attachments

  • IMG_0628v2.JPG
    IMG_0628v2.JPG
    60.7 KB · Views: 111
  • IMG_0630v1.JPG
    IMG_0630v1.JPG
    32.2 KB · Views: 110
  • IMG_0631v1.JPG
    IMG_0631v1.JPG
    70.9 KB · Views: 120
This Caproni it's Italeri kit? right?...really good work I think it's not an easy model...
 

Users who are viewing this thread

Back