vikingBerserker
Lieutenant General
Sweet!
Follow along with the video below to see how to install our site as a web app on your home screen.
Note: This feature may not be available in some browsers.
Ad: This forum contains affiliate links to products on Amazon and eBay. More information in Terms and rules
Michael, not a silly question and I'm only too glad to share. As mentioned to Mike earlier, this method of panel line enhancement is very experimental, I've not seen or read of this method being used before, so fingers crossed.
I should say the idea came from reading an article where felt tipped pen was used. But, this as one would expect, simply by the use of a felt tipped pen turned into a disaster for the modeller. Felt tip is not very kind to paint application and will either instantly or in time work its way up through any over paint. However, if using like but thinned paint, in theory it should work.
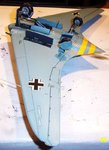
What I have done is diluted some black paint with thinners, a ration of roughly one third paint – two thirds thinners. Taking a fine brush (I used a long haired 20/0 brush) I've dipped it in the paint mix and then lightly dabbed the tip on some kitchen paper to remove the blob from the end of the brush and then run the brush slowly along the panel line, frequently dipping, dabbing and brushing. I worked on the parallel lines of one side of half a wing first. Any excess paint that flows onto the surface either side I left until I completed this first stage. By this time the paint should be starting to dry so taking a 'Q' tip, gently run it along the side of the panel line to remove most of the excess. This will leave a deep black line in the panel line and a lighter shade either side. Having done the parallel lines, you now repeat the process on the vertical.
The hope is that when the main lighter colour for this build is applied, the darker shade will show a darkening in the panel lines and surrounding areas. This may also mean that some effort is required to not spray heavily on the panel lines but still apply a good coat between the lines. Only trial and error and time will tell.
As for raised panel lines, my only suggestion is to use these as a guide to scribe the main areas with sunken panel lines, then sand or scrape the raised lines back to the plastic level.