Vic's grey over spray is a good call very thin mix light passes to build it up to what gives you the desired effect....
Navigation
Install the app
How to install the app on iOS
Follow along with the video below to see how to install our site as a web app on your home screen.
Note: This feature may not be available in some browsers.
More options
You are using an out of date browser. It may not display this or other websites correctly.
You should upgrade or use an alternative browser.
You should upgrade or use an alternative browser.
**** DONE: 1/72 PBY-5A Catalina RAAF 42 Sqn - Seaplanes / Floatplanes of WWII (1 Viewer)
- Thread starter parsifal
- Start date
Ad: This forum contains affiliate links to products on Amazon and eBay. More information in Terms and rules
More options
Who Replied?mikewint
Captain
On the Black Widow I used a diorama paint named "DUST" Very, Very thin. I used a small empty Testor's paint bottle filled with thinner (4 mL) and dipped a brush into the paint and cleaned the brush in the thinner. With a very thin paint you can spray as many times as you want to get the effect you want but you can't remove "too much"
- Thread starter
- #63
parsifal
Colonel
hi guys. I will slink away and have a think about the dusting issue, but i am very appreciative of all your advice and expertise.
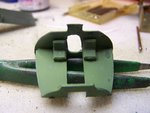
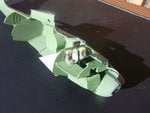
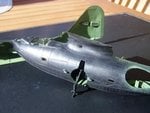
The bad news is that my detachable canopy idea didnt work. no harm done, other than some lost time and bruised pride, but it does mean i will need to button up the canopy conventionally, and limits visibility pretty badly. on the plus side, it reduces the internal details by a large amount.
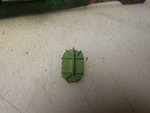
at last i had some daylight to take some photos, along with one or two progress shots that i took as i was building. Reasonably happy so far
The bad news is that my detachable canopy idea didnt work. no harm done, other than some lost time and bruised pride, but it does mean i will need to button up the canopy conventionally, and limits visibility pretty badly. on the plus side, it reduces the internal details by a large amount.
at last i had some daylight to take some photos, along with one or two progress shots that i took as i was building. Reasonably happy so far
Attachments
-
 102_2893.jpg66.4 KB · Views: 127
 -
 102_2894.jpg420.8 KB · Views: 120
 -
 102_2896.jpg647.3 KB · Views: 155
 -
 102_2898.jpg57.4 KB · Views: 122
 -
 102_2900.jpg64.2 KB · Views: 118
 -
 102_2901.jpg60 KB · Views: 150
 -
 102_2902.jpg57.3 KB · Views: 117
 -
 102_2903.jpg81.3 KB · Views: 124
 -
 102_2904.jpg64.8 KB · Views: 119
fubar57
General
In our competition, we are pretty flexible Michael, however I would like to see the fitted canopy in place to see you have done the work to make a good 'fit' and then without in your final pics so the internal detail you wish to display can be seen.
Michael, if I'm reading Wayne right, you don't have to glue the canopy on but they would like to see it fitted for the final photos to make sure it sits properly without any gaps. Your model is coming along nicely and I should have posted these photos earlier. A black walkway extends down the center of the hull full length. The waist gunners stood on a non-skid walkway. I used Tamiya Rubber and then dry brushed it with grey.
I hope these aren't too late and are of some help to you.
Geo
Vic Balshaw
Major General
That is looking good Michel and a nice pic of the guts from Geo.
Spot on George!
Nice progress there Michael
Nice progress there Michael
mikewint
Captain
Michael, with all the above nice work and an excellent start
- Thread starter
- #69
parsifal
Colonel
Sorry guys for the very slack reporting. ive spent the last two days doing some further internals. Ive resigned myself to the fact that once buttoned up, most of what Im doing wont be visible, but I really enjoy this scratch building stuff. Anyway, Ill post a couple of progress shots in a minute. very much a work in progress at the moment, so looking a little rough, but Im happy so far.
- Thread starter
- #70
parsifal
Colonel
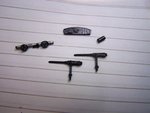
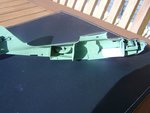
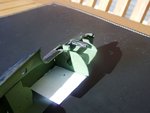
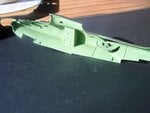
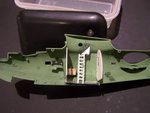
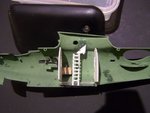
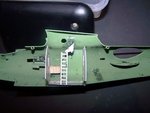
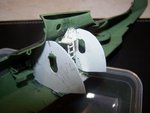
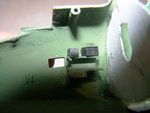
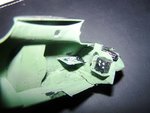
These are the progress shots. i had some difficulties. The rear bulkhead was mis-positioned and i had a deveil of a time with the engineers tower. im hoping when its all dry i can clean it up a bit.
The wheel bays are nothing like the real thing which means the galley area has to be extemporised, and i also had to be a bit creative in the positioning of the engineers ladder.
A little flamboyance...there is a readable map on the navigators table and a pair of spotting binoculars....but i forgot to leave enough room for the navigators radar scope.
i also had a lot of problems getting the bulkehead profiles the right size. I made a mistake with the rear bulhead leading into the sleeping area....doesnt have a watertight door like ive shown. i might go back and fix it, but i havent made up my mind yet
Attachments
fubar57
General
Nice job on the ladder and seat Michael.
Geo
Geo
mikewint
Captain
Nice progress
Crimea_River
Marshal
Good work Michael.
- Thread starter
- #74
parsifal
Colonel
ive said it before....but those close ups are absolutely brutal. it looks much better and cleaner in the flesh.
im still debating whether to widen the hatchway for the rear bulhead. im basing the layout on that PBY cutaway project that is on display in the US.
Next job is to fit the bunks in the rear compartment, or take out the rear bulkhead and modify it. then i might add some details to the rear observation area and the forward gunners station. Then its clean up time. Ive made some additional chairs and the fuel cylinders for the Galley there are also some fire extinguishers map bags and toll boxes to put into the interior.
Its a far cry from a faithful build, but its better than what the kit came with IMO. I want to include in my finished shots some extra shots of the internals before i button the whole thing up. most of what im doing will not be seen otherwise.
Vic Balshaw
Major General
Nice bit of modelling there Michael and your enjoying it.
Wildcat
Major
Nice work mate ")
keep up the good work Michael.
- Thread starter
- #78
parsifal
Colonel
At the moment Im trying to work out a way of making realistic looking canvas bunks . How to make plastic look like canvas or bedsheets......
fubar57
General
Though it might be difficult in your scale(or not), I've read about mixing white glue with water, wetting a tissue with said substance, draping it over a former until dry and then cutting to final shape. I've never used the process but have seen some very nice results in model magazines, ie; tarpaulins draped over uncovered engines and covers for tank storage bins.
Geo
Geo
Looks good so far Michael!
Users who are viewing this thread
Total: 2 (members: 0, guests: 2)