Airframes
Benevolens Magister
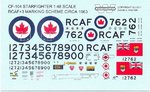
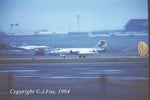
CF-104 '771', RCAF No3 Wing, Zweibrucken, November 1964.
Cory's recent question regarding CF-104 decals has given me the jolt I needed to get back to the bench after such a long absence due to pain and stiffness in the shoulder. Since I had an injection in the troublesome area a fortnight ago, things have improved slightly, although there's still some pain and discomfort, so I've decided to ease myself back into things, before getting back to the long-overdue commission builds I had been working on.
I've wanted to do a 'Starfighter' in the original natural metal finish of the RCAF for many years, and memories of seeing, and hearing that unique sound, of the Canadian examples at Prestwick, Scotland, fifty years ago (!!) are still fresh in my mind. Consequently, after receiving some great info from Geo (Fubar57), I was pointed in the right direction, and was able to carry out preliminary research and, fortunately, borrow some original 'Kodachrome' 35mm slides from my older brother, taken during our visit to Prestwick in November 1964, less than three months before the markings changed, with the introduction of Canada's current flag.
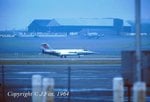
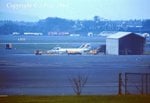
I've included some rather poor scans of a couple of the shots (the originals are beautifully clear and hold their full colour), with CF-104 serial number 12771 being prominent, and others parked outside the Scottish Aviation facility at Prestwick.
I've since established that '771' was with RCAF No.3 Wing, at Zweibrucken, Germany, when the Wing included 427 ("Lion") and 434 ("Bluenose") Squadrons, both in the Strike/Attack role, where 'Strike' = nuclear delivery, and 'Attack' = conventional weapons. As the aircraft were shared within the wing, and, at that time, didn't carry Squadron or Wing badges or Crests, it hasn't been possible, to date, to trace the Squadron in which it served at the time.
(This aircraft was Struck of Charge with Canadian Armed Forces in November 1971, going to the Royal Danish Air Force, as 'R-771', and is preserved today at Aalborg, in North Jutland, Denmark - which means I've seen it twice, as I was last there in 1990 !! )
Prestwick at the time was still a 'first stop' for many trans-Atlantic flights, as it had been during WW2, when a huge depot and base was maintained on one of the busiest airfields in the UK. All major servicing, overhaul, repair and up-dating for RCAF Europe Starfighters was contracted to Scottish Aviation, who's main base was on the airfield, and there were numerous 'movements' during our visit, all those years ago. Also, 'around the back' of the airfield, there was a huge storage depot, where lines of F-86 Sabres stood cocooned, along with some Avengers and, from memory, some F-4 Corsairs, awaiting either scrapping or shipping back to Canada, or disposal elsewhere.
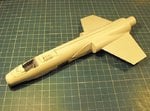
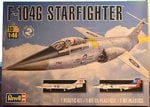
So, on to the build, which will be using the recently re-released Revell F-104G kit, in its current boxing including the later CAF markings for a Cold Lake based aircraft.
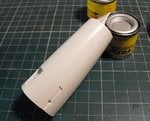
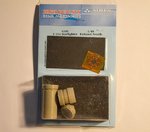
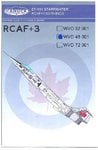
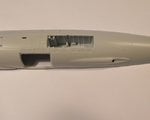
The kit is reasonable, considering its age, but there are a few areas which need attention or modification, and I'll be using a resin exhaust and a brass pitot, plus a little scratch-building to correct a few details for a RCAF bird, along with a decal sheet from Canuck Decals, which Cory told about.
The first few pics show the kit box art, resin exhaust and the pitot tube, and the 'Canuck Decals' to be used, plus three shots of the aircraft seen at Prestwick.
The build shots show:-
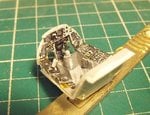
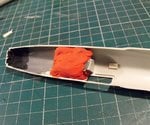
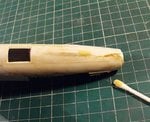
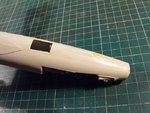
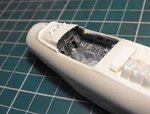
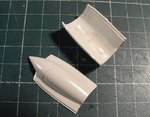
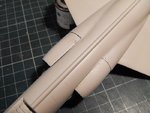
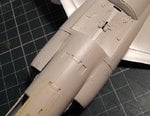
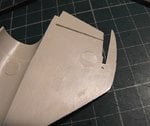
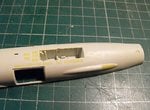
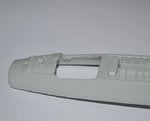
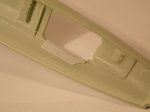
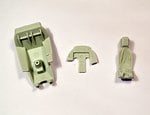
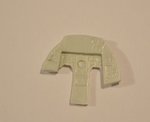
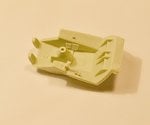
PICS 1 and 2. The gun port and gas vents for the 'Vulcan' gun need to be filled, as the CF-104 at that time did not carry the gun, the space being used for extra fuel, and the port and vents fared over.This was done here with 'Milliput'. The slot to the rear of the nose wheel well also needs to be filled, as this is for the spent case ejector chute, again, not fitted at the time.
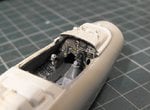
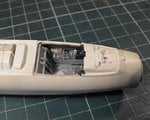
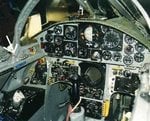
PICS 3 and 4. Some basic sidewall detail has been added to the cockpit, working from photos of an actual Canadian aircraft, rather than the inaccurate photos shown in some books, and a hole drilled, and backed with plastic card,ready for improvements to the HUD.
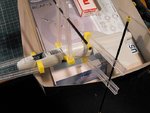
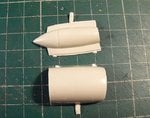
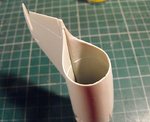
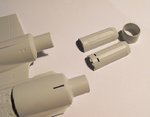
PIC 5. The kit tail pipe has been cut off part way, ready for the fitting of the excellent 'Aires' resin and PE parts, of which more later.
PIC 6. The kit parts for the cockpit, which have raised, but soft, detail, and an incorrect instrument panel for a CF-104. The seat shown is the C-2 type, included in the kit, although the kit instructions call for the Martin Baker type, also included, which again, is incorrect for a Canadian aircraft.
PICS 7 and 8. Filing off some of the raised panel detail, and adding the beginnings of a more accurate layout.
PIC 9. Some basic detail has been added to the cockpit tub, including a throttle lever, and the remainder will be completed with paint.
That's it so far, and apologies for a somewhat long-winded introductory post. It's been good to get back to the bench, but I now hurt like stink, so need a long rest !
All being well, I'll post some more, hopefully tomorrow evening.
Cory's recent question regarding CF-104 decals has given me the jolt I needed to get back to the bench after such a long absence due to pain and stiffness in the shoulder. Since I had an injection in the troublesome area a fortnight ago, things have improved slightly, although there's still some pain and discomfort, so I've decided to ease myself back into things, before getting back to the long-overdue commission builds I had been working on.
I've wanted to do a 'Starfighter' in the original natural metal finish of the RCAF for many years, and memories of seeing, and hearing that unique sound, of the Canadian examples at Prestwick, Scotland, fifty years ago (!!) are still fresh in my mind. Consequently, after receiving some great info from Geo (Fubar57), I was pointed in the right direction, and was able to carry out preliminary research and, fortunately, borrow some original 'Kodachrome' 35mm slides from my older brother, taken during our visit to Prestwick in November 1964, less than three months before the markings changed, with the introduction of Canada's current flag.
I've included some rather poor scans of a couple of the shots (the originals are beautifully clear and hold their full colour), with CF-104 serial number 12771 being prominent, and others parked outside the Scottish Aviation facility at Prestwick.
I've since established that '771' was with RCAF No.3 Wing, at Zweibrucken, Germany, when the Wing included 427 ("Lion") and 434 ("Bluenose") Squadrons, both in the Strike/Attack role, where 'Strike' = nuclear delivery, and 'Attack' = conventional weapons. As the aircraft were shared within the wing, and, at that time, didn't carry Squadron or Wing badges or Crests, it hasn't been possible, to date, to trace the Squadron in which it served at the time.
(This aircraft was Struck of Charge with Canadian Armed Forces in November 1971, going to the Royal Danish Air Force, as 'R-771', and is preserved today at Aalborg, in North Jutland, Denmark - which means I've seen it twice, as I was last there in 1990 !! )
Prestwick at the time was still a 'first stop' for many trans-Atlantic flights, as it had been during WW2, when a huge depot and base was maintained on one of the busiest airfields in the UK. All major servicing, overhaul, repair and up-dating for RCAF Europe Starfighters was contracted to Scottish Aviation, who's main base was on the airfield, and there were numerous 'movements' during our visit, all those years ago. Also, 'around the back' of the airfield, there was a huge storage depot, where lines of F-86 Sabres stood cocooned, along with some Avengers and, from memory, some F-4 Corsairs, awaiting either scrapping or shipping back to Canada, or disposal elsewhere.
So, on to the build, which will be using the recently re-released Revell F-104G kit, in its current boxing including the later CAF markings for a Cold Lake based aircraft.
The kit is reasonable, considering its age, but there are a few areas which need attention or modification, and I'll be using a resin exhaust and a brass pitot, plus a little scratch-building to correct a few details for a RCAF bird, along with a decal sheet from Canuck Decals, which Cory told about.
The first few pics show the kit box art, resin exhaust and the pitot tube, and the 'Canuck Decals' to be used, plus three shots of the aircraft seen at Prestwick.
The build shots show:-
PICS 1 and 2. The gun port and gas vents for the 'Vulcan' gun need to be filled, as the CF-104 at that time did not carry the gun, the space being used for extra fuel, and the port and vents fared over.This was done here with 'Milliput'. The slot to the rear of the nose wheel well also needs to be filled, as this is for the spent case ejector chute, again, not fitted at the time.
PICS 3 and 4. Some basic sidewall detail has been added to the cockpit, working from photos of an actual Canadian aircraft, rather than the inaccurate photos shown in some books, and a hole drilled, and backed with plastic card,ready for improvements to the HUD.
PIC 5. The kit tail pipe has been cut off part way, ready for the fitting of the excellent 'Aires' resin and PE parts, of which more later.
PIC 6. The kit parts for the cockpit, which have raised, but soft, detail, and an incorrect instrument panel for a CF-104. The seat shown is the C-2 type, included in the kit, although the kit instructions call for the Martin Baker type, also included, which again, is incorrect for a Canadian aircraft.
PICS 7 and 8. Filing off some of the raised panel detail, and adding the beginnings of a more accurate layout.
PIC 9. Some basic detail has been added to the cockpit tub, including a throttle lever, and the remainder will be completed with paint.
That's it so far, and apologies for a somewhat long-winded introductory post. It's been good to get back to the bench, but I now hurt like stink, so need a long rest !
All being well, I'll post some more, hopefully tomorrow evening.
Attachments
-
 DSC_0006 (2).JPG139 KB · Views: 272
 -
 DSC_0008.JPG102.5 KB · Views: 222
 -
 Buys 372.jpg46 KB · Views: 231
 -
 Buys 374.jpg67.5 KB · Views: 437
 -
 Pitot Starfighter.jpg79.3 KB · Views: 241
 -
 2014-12-04_5.JPG72.7 KB · Views: 273
 -
 2014-12-04_10.JPG114.6 KB · Views: 235
 -
 2014-12-04_9.JPG84.4 KB · Views: 224
 -
 DSCF0001 (3).JPG36 KB · Views: 223
 -
 DSCF0007.JPG110.8 KB · Views: 243
 -
 DSC_0013.JPG69.4 KB · Views: 225
 -
 DSC_0018.JPG64.2 KB · Views: 249
 -
 DSCF0002 (2).JPG44.7 KB · Views: 223
 -
 DSC_0005.JPG107.5 KB · Views: 252
 -
 DSC_0007.JPG70.6 KB · Views: 267
 -
 DSC_0035.JPG78.3 KB · Views: 221
 -
 DSC_0015.JPG76.8 KB · Views: 225
Last edited: