i like it Bill
Navigation
Install the app
How to install the app on iOS
Follow along with the video below to see how to install our site as a web app on your home screen.
Note: This feature may not be available in some browsers.
More options
You are using an out of date browser. It may not display this or other websites correctly.
You should upgrade or use an alternative browser.
You should upgrade or use an alternative browser.
**** DONE: 1/48 Otaki P-40e 196th IAP leningradsky VVS GB
- Thread starter N4521U
- Start date
Ad: This forum contains affiliate links to products on Amazon and eBay. More information in Terms and rules
More options
Who Replied?T Bolt
Colonel
looking good Bill! If you are going to add drop tanks I would do a single one under the belly. I don't believe the P-40E had hard points for tanks or bombs under the wings. That came on later models.
- Thread starter
- #63
N4521U
Plastic Pirate
I can live with that! One tank it is.
*On another note. Do you think the interior would have stayed green, or repainted gray?
*On another note. Do you think the interior would have stayed green, or repainted gray?
Last edited:
Green would seem right but you never know.....
- Thread starter
- #66
N4521U
Plastic Pirate
Green it is.
I love the help I get from yous guys!
Just finishing putting goodies on the walls of the cockpit, modified the back seat, made a floor plate for same. Now I just gotta make a frame support for that seat. I wouldn'r imagine they would go thru too much trouble for that KGB agent back there.
Would they have given him a seat belt??? Nah.
T Bolt
Colonel
I would think the new parts involved in the conversion of the backseat would be ether left bare aluminum or painted a different color since I don't believe Russian aircraft were ever painted interiors chromite green. Maybe leave the fuselage sides green and pick a Russian interior color for the rear seat and any other new parts. I know a light blue was used in some cases, close to RLM 65. The contrast in color might make it look more interesting.
- Thread starter
- #68
N4521U
Plastic Pirate
Food for thought T. At the factory at construction, would the whole of the inside of the fuselage have been painted zinc chromate green?
I do have some Alclad so bare metal would be possible. I was planning on just vertical and horizontal supports for the back seat on that line and leave the rear of the fuselage open rather than a wall behind the seat. This is getting very interesting, to say the least.
I do have some Alclad so bare metal would be possible. I was planning on just vertical and horizontal supports for the back seat on that line and leave the rear of the fuselage open rather than a wall behind the seat. This is getting very interesting, to say the least.
Vic Balshaw
Major General
They mostly used a silver or steel grey for the interior Bill, something similar to Humbrol 87 with a touch of silver added to give it a slight metallic look.
- Thread starter
- #70
N4521U
Plastic Pirate
Thanks for that Vic.
What I need to know now is if the Curtiss factory painted the whole of the inside of the fuselage, front to back, zinc chromate green, or just the cockpit area. Then like T says, the back seat area could have been left bare metal, or painted their gray color.
*Another thing, would the VVS have removed the armor plate from behind the pilot as well? Since all "extra weight" was being removed? Or perhaps that was left in as the seat was mounted to it.
Interestinger and interestinger eh?
Last edited:
Vic Balshaw
Major General
Imposing questions Bill, but when you think about it, all aircraft parts were treated to a coat of chromate in the building progressed, even the internal wing structures were sprayed before assembly, so yes the interior fuselage walls would have been sprayed, it's just the bits added by the Soviets that would be a silver grey.
As for armour plating, well your guess is as good as mine, if they wanted a fast light manoeuvrable aircraft with no armament, it's likely the armour plating would have gone as well.
As for armour plating, well your guess is as good as mine, if they wanted a fast light manoeuvrable aircraft with no armament, it's likely the armour plating would have gone as well.
- Thread starter
- #72
N4521U
Plastic Pirate
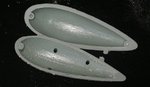
I have dry fitted the wings to the fuselage, a small gap on each side to correct. Two pics of the cockpit.
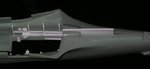
The fuel tank under the center is dry fitted. You can see how it is centered using the pins to locate the halves, not good. I use a good flat "bastard" file to flatten both sides, removing the pins in the process. I usually do this for the wings and fuselage sides as well, to minimize the gaps which are generally eliminated altogether. When I glued the tank sides together I only applied glue to the pin locations. This ensures no glue migrating to the surface. Since the faces are so flat there are no gaps.
Ive got the floor plate done for the seat. Now for the rib inside, wish I had one of them profile gadgets!!!!!!! I sailor on.
Attachments


T Bolt
Colonel
Bill, here's a couple of Life photos of the rear fuselage interior of an earlier model P-40 at the Curtiss plant. I can't see that a P-40E would be any different. Zinc chromite green lower skin and ribs, and zinc chromite yellow upper skin.
Attachments


- Thread starter
- #74
N4521U
Plastic Pirate
Been to Chicago, ended up in Lower Whacker, and the stock yards............. crockey. Was on a business trip to Valperiso Indiana when I worked for Kaiser and drove to Chicago to visit relations. It was winter as well. Beautiful place really.... I digress.
You know, I have seen them pictures, goes to show what the educated eye sees. Again I thank you for all your help.
I have just taken a close look at the wing gap. It is so small, to stick styrene to the edges would be insane, and I am bordering on it. So I am choosing to gap the fuselage. See the attached picture. I will taper this tab till everything fits.
Am I posting too much little stuff??? *perhaps not I am just thinking. These kinds of dialogs are why we are here.
Attachments
Last edited:
Vic Balshaw
Major General
You may have initially put your head on the block with this build Bill but by the looks of it you're well on the way to nailing it and coming up trumps.
great stuff Bill......we can never have too much information mate, keep at it....
Friend once told me "Knowledge not shared is wasted"
Friend once told me "Knowledge not shared is wasted"
Airframes
Benevolens Magister
Good stuff Bill, and all up-dates are welcome, big or small.
Crimea_River
Marshal
I agree. Great work going on there.
Users who are viewing this thread
Total: 1 (members: 0, guests: 1)