**** DONE: 1/48 Otaki P-40e 196th IAP leningradsky VVS GB

Ad: This forum contains affiliate links to products on Amazon and eBay. More information in Terms and rules

Thanks for all the encouragement.
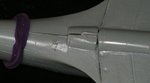
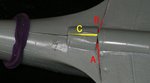
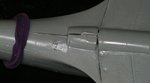
I've done some more on the back seat. But first..... the plastic on this kit is crap! Super glue would not hold the pvc card in place. As soon as I started shaping it to the contours it popped off. So a piece of the same kit went in. Got some big cracks to fill. And some shaping to do as well on that bottom trailing edge of the wing......

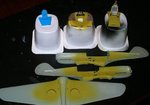
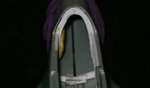
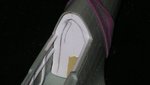
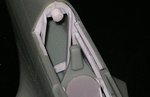
I made a back wall to fit the two haves, they are not even close to being alike. Then I cut the center out to for a rib. Then uprights for the seat support rails, then a headrest, don't want the KGB agent to be uncomfortable, do we. The seat is ready to install. All the new bit I will paint light blue, for that Carnaval look!
 

Attachments

  • 9c shaped rib.jpg
    9c shaped rib.jpg
    69.4 KB · Views: 106
  • 9a new wedge.jpg
    9a new wedge.jpg
    81.2 KB · Views: 101
  • 9b rib.jpg
    9b rib.jpg
    73.8 KB · Views: 84
  • 9d rib assy.jpg
    9d rib assy.jpg
    75.6 KB · Views: 88
Two flags?

Greed!


*I started six weeks of Irradiation treatments today.
I just hope I don't get so tired I can't finish both entries....
 
Last edited:
Me too, and good work too. BTW, wouldn't the 'agent' be NKVD ?

Not more research??????????
I will have to look that up......... too. LOL

*Did...... below is from Wikipedia..... the things you learn in here.
On February 3, 1941, the Special Sections of the NKVD responsible for military counterintelligence (CI) became part of the Army and Navy (RKKA and RKKF, respectively). The GUGB was separated from the NKVD and renamed the "People's Commissariat for State Security" (NKGB). After the German invasion, the NKVD and NKGB were reunited on 20 July 1941. The CI sections were returned to the NKVD in January 1942. In April 1943, the CI sections were again transferred to the People's Commissariats (Narkomat) of Defense and the Navy, becoming SMERSH (from Smert' Shpionam or "Death to Spies"); at the same time, the NKVD was again separated from the NKGB.
 
Last edited:
Thanks for all the encouragement guys........... But..........

I am so unhappy with this kit.... not the kit actually but the bl00dy sh!t plastic it's been made of......
Nothing sticks to it. Revell doesn't, and super glue doesn't. It all seems to just break off. The wedge I put in the bottom of the fuselage has just cut loose with slight pressure from the wing section. You can see it's almost dissapeared. I used Revell to glue that baby in there, and nothing!!!!!!!!!
9a new wedge.jpg
10b gap wedge.jpg
 
Sorry to hear that Bill. I suppose all you can do is try lots of different glues in the hope of finding one which will work on your teflon plastic.
 
I think the problem is the gap between the rear part of fuselage and the trailing adge of the wing. It is too strait. Looking at these images of that I'm almost sure that the main problem are forces running along these edges.
 
You might be right My Bro.. as well. But I would suggest removing of some plastic from areas red marked ( A and B ). Then making a styrene chock ( C ) and gluing it onto the gap firstly. It has to be longer than the small plate that Bill added there. If the fuselage fixed at the area I would add a thin and short plastic plate ( a strip ) bended and fitted to the bottom fuselage curvature. It would make a kind of step where the trailing adge of the wing could seat and be glued at the area. It would prvent it against going deeper. Also , the strip would make the joint more stable, when going from one half of the fuselage to the another one.
 

Attachments

  • edge1.jpg
    edge1.jpg
    94.4 KB · Views: 90
  • edges.jpg
    edges.jpg
    56.2 KB · Views: 104
Last edited:
You could be right Wojtek....but sometimes sh!t plastic.....is just that! Hope you get it sorted Bill.

Aaaamen bruddah!

Wojtek, I had the little "block" glued in to one side only, for dry fitting. My intention was just what you illustrated. I would taper the piece when attaching the sides together, then add a strip along that line toward the tail. I had used the Revell glue to attach the block. Problem is, as I was dry fitting the wing again the trailing edge of the wing pushed on that block, and it came loose. So therefore my deduction the plastic is in fact Sh!t !!! I may put a plate across the inside, and then dowel the bl00dy thing on each side.

The wedge is in there to widen the fuselage to fit the wing top to the fuselage so I don't have to do filling and shaping up there. Figured out of sight, out of mind. Who looks at the bottom???? No mirrors under this thing. I can guarantee That! All suggestions taken into consideration. They may not solve This problem, but they are food for thought.

Bill
 

Users who are viewing this thread

Back