Navigation
Install the app
How to install the app on iOS
Follow along with the video below to see how to install our site as a web app on your home screen.
Note: This feature may not be available in some browsers.
More options
You are using an out of date browser. It may not display this or other websites correctly.
You should upgrade or use an alternative browser.
You should upgrade or use an alternative browser.
**** DONE: 1/48 Tamiya Heinkel He-219 WNr 290123 of 1/NJG 1 Nightfighter GB
- Thread starter Crimea_River
- Start date
Ad: This forum contains affiliate links to products on Amazon and eBay. More information in Terms and rules
More options
Who Replied?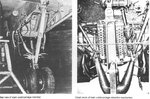
- Thread starter
- #182
Crimea_River
Marshal
Thanks Karl. Every pic I've seen is taken forwards so the back bulkhead remains a mystery.
sorry mate thought they were of the rear bulkhead !!!!, will try and look at the ref's again tomorrow when i can get at the other computer were they are stored
- Thread starter
- #184
Crimea_River
Marshal
The wing warp has been fixed - more or less. The plastic struts helped a bit, but since I had to taper the ends to fit between the wing halves, the reduced strength of the shallower struts was not enough to completely overcome the force built into the warp. To counter this, per Terry's suggestion, I taped the wing to an aluminum angle to hold it straight and then proceeded to glue the seams:

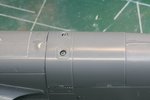
The results are not too bad as seen by the pic below. There's now a bit of an 'S' in the wing that won't be too evident to the naked eye but the straightness has been very much improved:

Dry fitting the engine cowl reveals an odd little molding fault that needs attention. The excess plastic where the leading edge of the wing meets the cowl needs to be removed:

That's it for today - 4 days actually as I'm off to the Great White North again for meetings at a construction site. I'll be back Friday but will watch the forums while away. See you then.
The results are not too bad as seen by the pic below. There's now a bit of an 'S' in the wing that won't be too evident to the naked eye but the straightness has been very much improved:
Dry fitting the engine cowl reveals an odd little molding fault that needs attention. The excess plastic where the leading edge of the wing meets the cowl needs to be removed:
That's it for today - 4 days actually as I'm off to the Great White North again for meetings at a construction site. I'll be back Friday but will watch the forums while away. See you then.
Airframes
Benevolens Magister
Great stuff Andy. That's only just visible in a photo with a straight edge next to it, so no chance of spotting it 'in real life'.
Darn! I should have sent you the magazine article on the build, as it mentions and shows that leading edge step!
Hope things go well on the trip.
Darn! I should have sent you the magazine article on the build, as it mentions and shows that leading edge step!
Hope things go well on the trip.
- Thread starter
- #186
Crimea_River
Marshal
You did send me that article Terry and it does mention the step as you say. Easy fix.
The article also mentioned the gaping hole at the back of the wheel well which the author also took a bit of license on. No pictures to dispute it ayway!
The article also mentioned the gaping hole at the back of the wheel well which the author also took a bit of license on. No pictures to dispute it ayway!
Airframes
Benevolens Magister
Oh! I think my brain cells need a boost!
- Thread starter
- #188
Crimea_River
Marshal
Terry, you send so much helpfull stuff to so many people that you have an excuse for losing track of it!
I just took these last couple if shots so you're caught right up to where I will pick up again Friday.
Pic 1 shows one of the plastic card bulkheads glued in. A bit of CA glue was needed to fill the gapo at the top - hard to get it exactly right when cutting. Of course there was an ejector pin mark right on top of one of the ribs in the nacelle, seen here with a bit of putty to fix it. No details on the bulkhead yet.
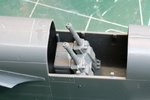
Pics 2 and 3 show the Schrage Musik installed. The MK108 barrels were drilled out as these will be the only parts you see once the cover is glued on. Consequently, I didn't spend much time detailing the MK108s. The barrels will need a bit of paint and that's it. The second pic shows the cover on (dry fitted only). Also seen is some CA glue yet to be sanded down along the seam and over some sink marks.
I just took these last couple if shots so you're caught right up to where I will pick up again Friday.
Pic 1 shows one of the plastic card bulkheads glued in. A bit of CA glue was needed to fill the gapo at the top - hard to get it exactly right when cutting. Of course there was an ejector pin mark right on top of one of the ribs in the nacelle, seen here with a bit of putty to fix it. No details on the bulkhead yet.
Pics 2 and 3 show the Schrage Musik installed. The MK108 barrels were drilled out as these will be the only parts you see once the cover is glued on. Consequently, I didn't spend much time detailing the MK108s. The barrels will need a bit of paint and that's it. The second pic shows the cover on (dry fitted only). Also seen is some CA glue yet to be sanded down along the seam and over some sink marks.
Attachments

looking real good Andy!8)
Night Fighter Nut
Master Sergeant
Coming along very nicely Andy.
Airframes
Benevolens Magister
Looking good Andy.
T Bolt
Colonel
Real nice Andy!
Lucky13
Forum Mascot
Nice work Andy!
- Thread starter
- #194
Crimea_River
Marshal
Thanks guys. I arrived at the job site this morning. Temperature is minus 41C! Hopefully will have fingers left to finish this model!
Airframes
Benevolens Magister
That sounds just a tad chilly !
- Thread starter
- #196
Crimea_River
Marshal
Yes, quite fresh!
Vic Balshaw
Major General
Amazing work Andy, watch them fingers in all that frost. Can't imagine how cold that is.
- Thread starter
- #198
Crimea_River
Marshal
Thanks Vic. It's warming up to -23 tomorrow. Much better!
Aaron Brooks Wolters
Brigadier General
Excellent work Andy! Keep the fingers warm.
tigerdriver
Staff Sergeant
great stuff , the cockpit looks awesome
Users who are viewing this thread
Total: 1 (members: 0, guests: 1)