very nice Andy
Navigation
Install the app
How to install the app on iOS
Follow along with the video below to see how to install our site as a web app on your home screen.
Note: This feature may not be available in some browsers.
More options
You are using an out of date browser. It may not display this or other websites correctly.
You should upgrade or use an alternative browser.
You should upgrade or use an alternative browser.
**** DONE: 1/48 Tamiya Heinkel He-219 WNr 290123 of 1/NJG 1 Nightfighter GB
- Thread starter Crimea_River
- Start date
Ad: This forum contains affiliate links to products on Amazon and eBay. More information in Terms and rules
More options
Who Replied?- Thread starter
- #302
Crimea_River
Marshal
Thanks everyone. I want to get some good progress in these next few days as I'll be away on a ski weekend next week - cutting it close to the deadline.
B-17engineer
Colonel
Even though I'm not on a deadline, same here Andy, next weekend will be away for my brothers 16th birthday
T Bolt
Colonel
Fantastic Andy! Love the added detail.
Lucky13
Forum Mascot
Outstanding work Andy! 
- Thread starter
- #306
Crimea_River
Marshal
Thanks Harrison, Glenn, Jan.
I bit more added detail. I found this rather late but another modeller I saw on the net figures there are exhausts for the main wing heater in the upper main wing surfaces per the below drawing:

Tamiya provided a circular panel but not the small holes suggested by the diagram so I drilled these out like the other guy did. This seems a bit speculative as I've not seen any photos/profiles/drawings to support this other than the one above it but makes sense.

Here's how many spots I fixed after small imperfections were seen on the prime coat:

I'll post pics soon of the RLM 75 going on. Stay tuned.
I bit more added detail. I found this rather late but another modeller I saw on the net figures there are exhausts for the main wing heater in the upper main wing surfaces per the below drawing:
Tamiya provided a circular panel but not the small holes suggested by the diagram so I drilled these out like the other guy did. This seems a bit speculative as I've not seen any photos/profiles/drawings to support this other than the one above it but makes sense.
Here's how many spots I fixed after small imperfections were seen on the prime coat:
I'll post pics soon of the RLM 75 going on. Stay tuned.
Airframes
Benevolens Magister
Good stuff Andy. I think I've seen those vents in a pic somewhere, if I can find it !
- Thread starter
- #308
Crimea_River
Marshal
No worries Terry. I'm not going to plug them now if they're not quite right!
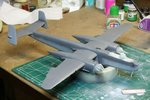
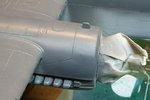
OK, the RLM 75 has been sprayed on. Below is an overall shot and the one under that is the repaired cowl seam and panel line on the engine nacelle from yesterday's post. It didn't turn out perfect but it's good enough, especially once the squiggles go on. I'll let the 75 dry overnight then tackle these tomorrow.
Ciao for now.
Attachments
Airframes
Benevolens Magister
Nice! And I agree about the corrected joint - it won't be seen under the welle and clear coats.
T Bolt
Colonel
Real sharp Andy.
Aaron Brooks Wolters
Brigadier General
This is looking really good!! Excellent work Andy!
B-17engineer
Colonel
Nice work Andy
Vic Balshaw
Major General
Top notch Andy looking real good.
Nice Andy... look forward to the next bit of painting!!
- Thread starter
- #315
Crimea_River
Marshal
I'm not!
Airframes
Benevolens Magister
Ah, go on, go on, go on !
- Thread starter
- #317
Crimea_River
Marshal
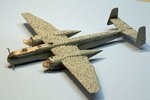
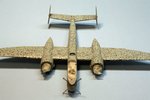
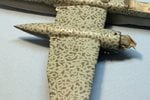
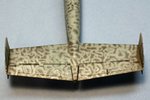
Alright, here you go. About 2 hours of airbrushing produced this result - which I'm maybe 70% happy with. I need much more practice with this technique. The squiggles are RLM 76 and look good to me in some places and other spots are kind of botched up.
Pics 1 and 2 Overall shots from the quarter and front. Overall looks not too bad but there are spots where the squiggles are too wide, giving a bit of a patchy look. To keep the pattern straight along what will eventually be the demarcation between the upper camo and black undersides, I had applied some masking tape but removed it before these photos were taken. Edit: BTW, the flaps are just taped on right now so that the pattern could be sprayed continuously over them. They'll be posed in the deployed position when done.
Pic 3 Starboard wing which turned out pretty good. You can still see some places where the paint was too thinly applied. I'll go over these later when my nerves have calmed down.
Pic 4 Not so nice. Large variation in line thicknesses and paint thickness. I'll probably do this area over.
Next will be painting the undersides and rudders a coat of slightly lightened black. Thanks for your comments. Anyone with tips on this technique, please chime in. Constructive criticism is very welcome!
Attachments
Last edited:
I think it looks very good overall. Remember that if the camo. was applied in the field it wouldn't be perfect either. The main problem area could be resprayed with the base colour and redone. The tails are not helping with this area as they hamper movement and give the blobby effect. Try to start and finish your sprayed line off the model as this will avoid that. There may also have been a build up of paint that had dried in the airbrush if this was the last area done which can lead to an uneven finish so a thourough clean about halfway through the process will avoid this.
For a first go this is a very good result.
For a first go this is a very good result.
T Bolt
Colonel
Looks fantastic Andy!!! Your hand and arm must be tired from that work-out. I think the little unevenness you see will disappear with the clear coat/dull coat/weathering. I know my 109E-1 looked much better when all that was done.
- Thread starter
- #320
Crimea_River
Marshal
Thanks guys.
Lewis, the tail was actually where I started. I had been practicing on a photocopy of a scale drawing provided with the kit. As I discovered, the paint doesn't go on the model the same way as on paper so I found myself adjusting pressure and paint/thinner ratio as I went along here. Your suggestion is what I'm thinking of doing - sand the area down, respray the 75 and redo the squiggles.
I did end up cleaning the tip maybe a dozen times during the session as it was getting a bit sputtery at times.
Users who are viewing this thread
Total: 1 (members: 0, guests: 1)