Navigation
Install the app
How to install the app on iOS
Follow along with the video below to see how to install our site as a web app on your home screen.
Note: This feature may not be available in some browsers.
More options
You are using an out of date browser. It may not display this or other websites correctly.
You should upgrade or use an alternative browser.
You should upgrade or use an alternative browser.
**** DONE: 1/48 Tamiya Heinkel He-219 WNr 290123 of 1/NJG 1 Nightfighter GB
- Thread starter Crimea_River
- Start date
Ad: This forum contains affiliate links to products on Amazon and eBay. More information in Terms and rules
More options
Who Replied?Erich
the old Sage
just to be aware the A-0 that you are modelling indeed had the night ground attack scheme of black undersides, the guys found the original black paint and grey blue welle pattern beneath all the USA overpainted crap.
time to travel north through the snows
time to travel north through the snows
- Thread starter
- #83
Crimea_River
Marshal
Thanks Erich, but wasn't 290123 an A-2?
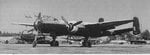
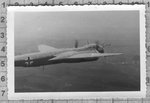
At any rate, the open question I have now is this: There appear to be two interpretations of the upper camo scheme for He219 WNr 290123. This plane features the black undersides but as for the top, some maintain that the aircraft likely had a 76 base paint with 75 patches oversprayed but others maintain that the base coat was 75 and that a wave pattern of 76 was applied over that. The latter scheme is featured on the specimen under restoration at the NASM (see post #5). The one period photo of this plane I've seen shows the upper surfaces to be very light and it's difficult to tell what the scheme is. However, the engine cowls appear to be very light all around, leading me to think that the likely scheme was 75 patches over a base 76. In the absence of better evidence, I'd lean toward that. However, other schemes in WNr's close to 290123 appear to support the 76 waves over a 75 base coulour. Check out these. The catured one is 290126 and the other is believe to be 290068, obtained from Peter Evans over at LEMB. If anyone has some good info on this, I'd appreciate hearing about it.
At any rate, the open question I have now is this: There appear to be two interpretations of the upper camo scheme for He219 WNr 290123. This plane features the black undersides but as for the top, some maintain that the aircraft likely had a 76 base paint with 75 patches oversprayed but others maintain that the base coat was 75 and that a wave pattern of 76 was applied over that. The latter scheme is featured on the specimen under restoration at the NASM (see post #5). The one period photo of this plane I've seen shows the upper surfaces to be very light and it's difficult to tell what the scheme is. However, the engine cowls appear to be very light all around, leading me to think that the likely scheme was 75 patches over a base 76. In the absence of better evidence, I'd lean toward that. However, other schemes in WNr's close to 290123 appear to support the 76 waves over a 75 base coulour. Check out these. The catured one is 290126 and the other is believe to be 290068, obtained from Peter Evans over at LEMB. If anyone has some good info on this, I'd appreciate hearing about it.
Attachments
Last edited:
Airframes
Benevolens Magister
I'd say 76 with 75 over on both. The tonal values show this, and it doesn't make sense to use a dark base colour with a lighter overspray.
In the pics I sent you, and a couple of others I have, the predominant pattern seems to be mottle, although a 'half-hearted' attempt at welle can be seen in some areas on one or two examples.
There has been some misleading info over the last forty years or so, compounded by authors basing schemes on, for example, the RAFM Hendon Bf110, which was resprayed in a representative scheme, which was not the scheme the aircraft was wearing when captured.
vikingBerserker
Lieutenant General
The picture looks alot like the pattern Jan is using on his build, post #47
http://www.ww2aircraft.net/forum/8-...genstein-junkers-ju-88c-6-n-f-gb-26842-4.html
I assume the Luftwaffe would have had a standard camo pattern like that and not have created a new one for only that plane.
http://www.ww2aircraft.net/forum/8-...genstein-junkers-ju-88c-6-n-f-gb-26842-4.html
I assume the Luftwaffe would have had a standard camo pattern like that and not have created a new one for only that plane.
- Thread starter
- #86
Crimea_River
Marshal
Thanks guys. I tend to agree with you but some doubt still remains. I saw a video somewhere on the Smithsonian restoration and they went through quite a bit of analysis getting through the layers of paint on their display and then came up with the 76 on 75.
Maximowitz
Tech Sergeant
You'll have to build two Andy!
- Thread starter
- #88
Crimea_River
Marshal
Ha! By the time I'm done this one I'm sure I wll want to move on!
EDIT: BTW, I'm on my 3rd try for the home made resin radar set. First time trying to make my own resin parts and I'm on a learning curve. Stripping the mold on the next one tonight.
EDIT: BTW, I'm on my 3rd try for the home made resin radar set. First time trying to make my own resin parts and I'm on a learning curve. Stripping the mold on the next one tonight.
Last edited:
Vic Balshaw
Major General
Stripping the mold on the next one tonight.
You know what they say, 'third time lucky'. Good luck my man.
- Thread starter
- #90
Crimea_River
Marshal
More like strike 3. I can not seem to get a decent cast of the eyepiece. Decided to make the parts from solid plastic bits and pass on the resin.
Maximowitz
Tech Sergeant
One way or another I'm sure you'll triumph. 
- Thread starter
- #92
Crimea_River
Marshal
Well, "triumph" may be a bit strong. I'll take "make do" as success on this little piece!
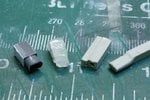
Shown below is where I currently stand. The piece on the left is my original box from the kit with the side wall added to make up for what was lost in sawing this piece off. The piece of crap next to it is my "best" resin cast (attempt 2 of 3). Un - f!cking - acceptable! The two pieces on the right are showing the most promise, being made from square plastic rod that will be cut and shaped to the appropriate profiles. The piece on the right, if it works out, will become the eyepiece and so far has been made from square plastic rod heated over a candle and squashed with a flat knife then filed to shape. More work to come on this, obviously. A bit slow I know.
Shown below is where I currently stand. The piece on the left is my original box from the kit with the side wall added to make up for what was lost in sawing this piece off. The piece of crap next to it is my "best" resin cast (attempt 2 of 3). Un - f!cking - acceptable! The two pieces on the right are showing the most promise, being made from square plastic rod that will be cut and shaped to the appropriate profiles. The piece on the right, if it works out, will become the eyepiece and so far has been made from square plastic rod heated over a candle and squashed with a flat knife then filed to shape. More work to come on this, obviously. A bit slow I know.
Attachments
Vic Balshaw
Major General
This attempt is looking good Andy, almost home and hosed.
Not quite....but almost!
- Thread starter
- #95
Crimea_River
Marshal
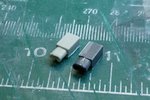
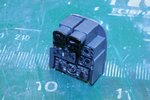
OK, back on track with the finished diplicate FuG 220 kit. The two pics below show the pieces as they came together. The resin option didn't pan out so I used the square plastic rod. The eye piece was the piece of square rod, heated and squashed. The end was then hollowed out with a ball-tip Dremel bit and the cushions on the end were made with several successive layers of PVA glue. In the finished shot, the home made piece is on the left. It turned out marginally smaller than the kit piece but close enough (not enough to "triumph" but it does "make do"!)
Attachments
Aaron Brooks Wolters
Brigadier General
WOW!! Excellent work CR!!! I hope I have the patience after I get some experience under my belt.

vikingBerserker
Lieutenant General
Nicely done!
- Thread starter
- #98
Crimea_River
Marshal
Thanks guys.
Airframes
Benevolens Magister
Bl**dy good work Andy !
Like it Andy...
Users who are viewing this thread
Total: 1 (members: 0, guests: 1)