**** DONE: 1/48 Tamiya Heinkel He-219 WNr 290123 of 1/NJG 1 Nightfighter GB

Ad: This forum contains affiliate links to products on Amazon and eBay. More information in Terms and rules

Nasm have designated this Uhu as an A-2/R4

The topic was about the color of the 'squiggle' camouflage appearing to be the mysterious RLM 84. I just received a reply from the museum project director, Mr. Tom Dietz confirming the color is what is known as RLM 84.


Quoted Text

Dear Mr. Boucher:
The color used for the squiggle pattern was matched to well preserved paint found under the aircraft's empennage. It is one of the undocumented late war "duck egg green" colors that started to appear in the fall of 1944. It's very similar to RAF Sky. On the upper surfacesof the NASM He 219, it was applied in a squiggle pattern over a base of RLM 75. The aircraft's undersurfaces, fuselage sides, and the vertical stabilizers were black when it left the factory in November 1944. At some point these surfaces were overpainted with the same "duck egg green" color as had been used for the upper surface camouflage. We decided to restore the aircraft to its appearance when it left the factory. No unit markings were uncovered.
The aircraft's engines and wings will enter the shop for restoration later this year. Once that work is completed, they will be joined to the fuselage at the Hazy Center.

Thomas J. Dietz
Museum Specialist
Aeronautics Division
National Air and Space Museum
Washington, DC
 
This info from Tom Dietz has been posted elsewhere in reponse to the question on the camo scheme used for the NASM He 219 display. Interestingly, the restorers matched exactly the scheme found inside the wing roots (original factory applied) that escaped the overpaint done by the US after capture. They actually continued the squiggle pattern from the original factory paint. See here:Heinkel He219

The NASMs Uhu is WNr 290202, which is 79 units after mine. It continues to point to the possibility of light-coloured squiggles over RLM 75.

I wonder what Mr Dietz would have to say about the radar set. The NASM's specimen has the mount for the rear-facing antenna but, as with the forward antennas, do bot yet appeatr to be installed on photos availble on the web.
 
correct Tom told me the same back in 99. He has since passed away so the chap in your posted link has taken over care it apepars ? there are several versions of photos, with the display at the museum of a closed canopy/cockpit sadly and the tail surfaces and fuselage in their version of the paint job in the Welle pattern. I still do not think they ahve it right but oh well...........my opinion of course.

you are working on an A-7 correcto ? the werke nummer would be much higher in the 310 *** numerations

the NASM's crate had a three man crew and would of had angled dipoles like the A-7. The A-7 as standard had the reduced four 2cm forward cannons and the upward firing SM of two 3cm Mk 108's.

Are you using Roland Remps referecne by chance ? the authoritative work so far but still has some internal probs within.
 
Last edited:
Erich, my rig is actually an A-2 WNr 290123. I need to edit my intro in post 1 since I used Tamiya's erroneous box labeling to call this an A-7. I was skeptical of the welle pattern as well until the chap in the above link described what they did at the restoration shop. When the plane was repainted by its captors, they apparently just painted the exterior surfaces. On dissassembly of the wings, the orginal factory applied camo showed up in the previously hidden wing roots leading the team to conclude that the scheme was 76 (or 84) wellen over 75. Sounds convincing. And I don't have the Remp work but may yet get it. Will check with my supplier this weekend.

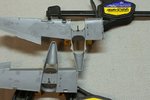
Moved away from the cockpit and did a bit of work on the wings. The wheel wells needed a bit of "pursuasion" to fit into the nacelles properly. Again, some disappointment here. The well details are very sparse and there's no rear bulkhead in the wells so you can see right down into the pointy end of the nacelles. I'll need to make some parts here.
 

Attachments

  • 101130 Nacelles Clamped.jpg
    101130 Nacelles Clamped.jpg
    96.9 KB · Views: 217
Thanks Terry. I'll definitely scratch build some details once I line up a few references. I did order the Remp book yesterday so, while I wait, I may set this model aside for a while and work on Keltie's Spit in the meantime.
 
Thanks Paul. I have the book by Remp on order so have held off on any further detail work until I get it. The starboard side of the R/O's office is a bit of a mystery at this point and I want to get a few more reference pics of this area before launching into a scratch build of this area. There's a partial at cockpitinstrumente.de that will be helpful but it doesn't show the full wall.
 
No worries Erich. I realize that the available info on this plane is scant. I'll just need to make do with what I'll have - or fly to Washington to study the NASM specimen but that's not an opytion for me at this point.
 
I've just read through this whole thread again in anticipation of starting back on this kit. I have, since the last post, received and read the Remp work on the Uhu which, as Erich pointed out, has some good info in it but at the same time it's dissappointing in that the editing is poor (many obvious mistakes) and also in that Remp was apparently denied access to the Garber facility to help with some details in his book. It would have been great to get some "insider info" on the only example of the Uhu left in the world.

Going forward, I've resolved the following:

- My subject, WNr 290123 will have the angled dipole antennae as evident in the one photo of this rig.
- I'll leave the second R/O radar eyepiece, although I agree with Erich that it likely wasn't installed. I've learned that very few Uhu's had the rear-facing radar.
- The camouflage I will depict will be the RLM 84 squiggles over a base of 75 as the article from the Garber facility paint work found the original paint as such in the wing roots. Also, photos of WNr's close to mine arguably support this pattern.
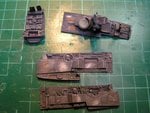
- There appears to be little or no good picorial information on the starboard sidewall of the R/O's position. Tamiya have convenienlty left it void of any detail whatsoever - lazy ba$tard$. The only good thing I could find was the below pic of a resin-update set (NOTE - These are someone else's work!) which I will use to scratch built the sidewall details. So that will be where I restart this project.
 

Attachments

  • P2140002-1.jpg
    P2140002-1.jpg
    101.8 KB · Views: 181
Sounds good Andy. I think whoever painted the resin stuff slightly overdid the paint wear, considering these were relatively new aircraft, but it looks good all the same.
 
Thanks guys. I agree with you Terry, although I think he did a nice job of it.

Spent an hour or so yesterday building up the R/O's stbd wall with card. Not sure how I'm going to replicate what appears to be a lot of breaker switches along the upper side of the wall. My spares box yielded nothing of use so ideas are welcome.
 

Users who are viewing this thread

Back