Navigation
Install the app
How to install the app on iOS
Follow along with the video below to see how to install our site as a web app on your home screen.
Note: This feature may not be available in some browsers.
More options
You are using an out of date browser. It may not display this or other websites correctly.
You should upgrade or use an alternative browser.
You should upgrade or use an alternative browser.
***DONE: Bell p-39N Airacobra 42-18393 "Millie" 350th FG 346th FS Group Build
- Thread starter ozhawk40
- Start date
Ad: This forum contains affiliate links to products on Amazon and eBay. More information in Terms and rules
More options
Who Replied?109ROAMING
2nd Lieutenant
Sweet work! 8)
Vic Balshaw
Major General
Great detail Pete, and had no problem finding the Hurricane, a bit like a rose amidst the thorns…....

- Thread starter
- #104
ozhawk40
Master Sergeant
Thanks guys.
Yes the three squadrons in the 350th FG each had a hurricane as "hack" Aircraft. A couple were converted to two seaters. One was even painted in OD/NG with a shark mouth.
Photos courtesy of Keith Vizcarra - 350th Web blog
Hurricanes - Page 1
Pic 1
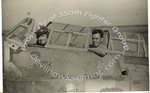
Dutch Miller and unknown in Hurricane IIc Serial Number KX857. Air Britains RAF Aircraft KA100-KZ999 gives KX857 as one of a batch of 1455 Hurricane IIB, IIC, IID, and IVs delivered from Hawkers Kingston and Langley factorys between 11/1942 and 5/1943, noting that it went to the Middle East and that there was No Further Trace.
Pic 2
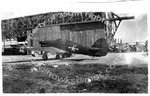
Shark Mouth Hurricane. Now this is a strange one. I will have to wait for a better scan to determine the tail number. Possibly 4265. From Hugh Dow (350th Pilot):The second Hurricane is almost certainly the one I flew down to Setif, without a canopy, in January 44, to trade for the new replacement, the first Hurry. It was a bloody cold trip and by the time I reached the RAF field at Bone, on the coast, a big piece of the fabric had torn away from the fuselage from the open cockpit rail and was flapping in the wind against the fuselage. I decided to put it on the ground and try to find someone to repair it. A willing Irk, RAF nick name for their aircraft maintenance types, after recovering from the scene, got some dope and stuck the fabric back on the fuselage.
Yes the three squadrons in the 350th FG each had a hurricane as "hack" Aircraft. A couple were converted to two seaters. One was even painted in OD/NG with a shark mouth.
Photos courtesy of Keith Vizcarra - 350th Web blog
Hurricanes - Page 1
Pic 1
Dutch Miller and unknown in Hurricane IIc Serial Number KX857. Air Britains RAF Aircraft KA100-KZ999 gives KX857 as one of a batch of 1455 Hurricane IIB, IIC, IID, and IVs delivered from Hawkers Kingston and Langley factorys between 11/1942 and 5/1943, noting that it went to the Middle East and that there was No Further Trace.
Pic 2
Shark Mouth Hurricane. Now this is a strange one. I will have to wait for a better scan to determine the tail number. Possibly 4265. From Hugh Dow (350th Pilot):The second Hurricane is almost certainly the one I flew down to Setif, without a canopy, in January 44, to trade for the new replacement, the first Hurry. It was a bloody cold trip and by the time I reached the RAF field at Bone, on the coast, a big piece of the fabric had torn away from the fuselage from the open cockpit rail and was flapping in the wind against the fuselage. I decided to put it on the ground and try to find someone to repair it. A willing Irk, RAF nick name for their aircraft maintenance types, after recovering from the scene, got some dope and stuck the fabric back on the fuselage.
Attachments
Real Nice Peter....
- Thread starter
- #107
ozhawk40
Master Sergeant
Thanks Wayne,Micdrow
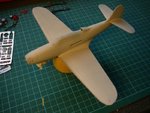
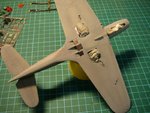
Here's where I'm at today. Too hot to do the gardening - 34C, so made some progress on the 'cobra.
Finished to cockpit by adding the gunsight and final details. Added the canopy, masks and doors. Doors were temporary glued with PVA, so I can pull them off later to display open if I decide to. Added the PE divider to the carb intake and 'nostrils'. Not sure what their function is - probably related to 50 cal installation - I must find out. I did not use the locating holes, but placed them looking at references.
Time to hit it with primer - all looks good. Pre-shade.
I was a little heavier around the wing walkways, as I wanted them to be a little darker appearing. See if this does the trick.
Cheers
Peter
Attachments
Last edited:
nice peter
Vic Balshaw
Major General
Love it
vikingBerserker
Lieutenant General
Nicely done Peter!
You refer to PVA as a temporary glue, what is that?
You refer to PVA as a temporary glue, what is that?
- Thread starter
- #112
ozhawk40
Master Sergeant
Cheers Kieth, Rochie, Vic and VB
PVA glue is "PolyVinyl Acetate". Can be called "White Glue" or wood glue. It dries clear and is useful for this job because theoretically (fingers crossed) - it does not really stick to plastic. It holds but will pull away without too much trouble.
Lets hope so.
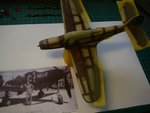
Anyway, I've laid the first Neutral Gray coat on the underside and remembered that I needed to install the photo etch radiator ducting, so out with the CA (super) glue and get those in. Eduard also supply the mesh, so I put those in too, but you cannot see them behind the ducting. Oh well. I got sick of the liquid super glue I normally use and have switched to the "gel" version - much easier!
I hope to mask off and get the OD on tomorrow. Cheers.
Peter
PVA glue is "PolyVinyl Acetate". Can be called "White Glue" or wood glue. It dries clear and is useful for this job because theoretically (fingers crossed) - it does not really stick to plastic. It holds but will pull away without too much trouble.
Lets hope so.
Anyway, I've laid the first Neutral Gray coat on the underside and remembered that I needed to install the photo etch radiator ducting, so out with the CA (super) glue and get those in. Eduard also supply the mesh, so I put those in too, but you cannot see them behind the ducting. Oh well. I got sick of the liquid super glue I normally use and have switched to the "gel" version - much easier!
I hope to mask off and get the OD on tomorrow. Cheers.
Peter
Attachments
B-17engineer
Colonel
Nice!
Airframes
Benevolens Magister
Looks great Peter. That PVA is handy stuff, good for blending canopy joints and similar too, so that they can be painted to look part of the airframe.
vikingBerserker
Lieutenant General
Very cool. Thanks Peter and Terry for the education on using PVA!
dirkpitt289
Master Sergeant
Looking real good Ozhawk. I have a feeling this is going to be a spectacular looking bird when its done.
Matt308
Glock Perfection
Coming along very nicely!!
109ROAMING
2nd Lieutenant
8)
- Thread starter
- #120
ozhawk40
Master Sergeant
Thanks for the encouragment guys!
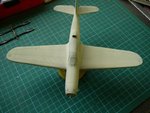
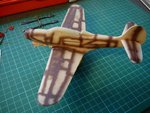
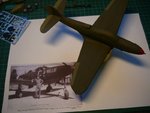
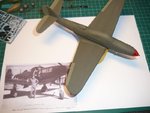
Another productive day today on the cobra. I didn't avoid the gardening today, but I still managed to mask and spray the OD, so some progress to report.
I masked up and sprayed the rudder, elevators and ailerons for a coat of faded olive drab - It was very common for these surfaces to fade out quickly. If you look at the colour pic I posted previously, the cobra coded "S" at the head of the line up shows this quite distinctly, so I was after this effect.
Once those where sprayed I re-masked for the normal Olive Drab and sprayed that. It appears dark under un-natural light, but when under bright light it shows the pre-shade clearly. I'm happy with the result, so next it's the yellow stripe theater markings.
Cheers
Peter
Attachments
Last edited:
Users who are viewing this thread
Total: 1 (members: 0, guests: 1)