**** DONE: Hurricane Mk1, L1807, DU-X, 312 (Czech)Sqn, RAF, October 1940 Group Build. (1 Viewer)

Ad: This forum contains affiliate links to products on Amazon and eBay. More information in Terms and rules

Thanks Andy.
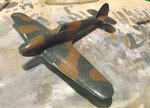
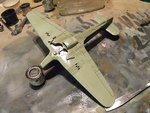
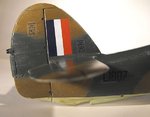
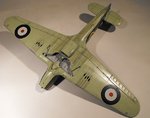
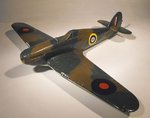
I've now done some light panel line work, mainly on the control surfaces, but also around some of the prominent access panels, cowling joints etc. Some staining, dirt and paint wear/chipping has also been added, and the model is now gloss coated.
Note that the gun port panels are bare at the moment, and will be covered in tissue, painted, torn and stained later.
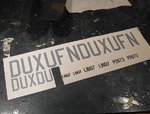
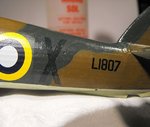
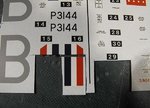
Next step is the decals, once I've made the code letters and serial numbers.
Thanks again for your interest and support.
 

Attachments

  • BoB Hurri build 106.jpg
    BoB Hurri build 106.jpg
    53.9 KB · Views: 73
  • BoB Hurri build 105.jpg
    BoB Hurri build 105.jpg
    67.3 KB · Views: 68
Thanks very much guys, I should have the decals made, and on, in the next couple of days - I hope!
Andy, the 'mat' is the paper covering the table I spray on - I'm thinking of sending it to the Tait Modern Gallery when I'm finished with it!
Not long now Roman, and the model should be on its' way to Zlinn !
Take your time Terry. You don´t need to be in hurry with this Hurry!
 
Thanks guys. Got the code letter decals made,but will probably have to over paint them, to help the density. Hope to start putting on the decals tonight.
 
Started the decals a bit later than intended. I wanted to check-out the density of the Hurricane's code letters, as I have some other 'thin' home made decals made for the 32nd scale Bf109, which I need to know if they'll require over-painting.
The answer in both cases is yes !
Ink-jet printer ink is fine on a solid background, but doesn't hold density on the transparent decal film in certain colours. ( Laser printed decals are only marginally better.) The code letters are one of these 'certain colours', so I wanted to make a test.
The fuselage roundels were applied first (minus their red centre spots), in order to act as a 'marker' for positioning the code letters, then the most accessible (on the fuselage) single code letter was applied, on the port side, in this case the individual letter 'X'. Sure enough, it reacted as I thought it would, by allowing the darker, underlying colours to show through. This will be painted over with the correct colour later.
PIC 1. Shows the home made decal sheet, in two scales, as I need similar codes for the 1/32nd scale version, and another lot for the next 32nd scale Hurricane, which will be too late for this GB.
PIC 2. The 'X', showing the problem. Note the serial number, which is acceptable enough, and will look denser once the clear gloss and clear matt coats are applied.
PIC 3. The fin flashes carried by this squadron were the later, shorter version, so the kit decals had to be adapted. This simply involved measuring, and cutting against a steel rule.
PIC 4. Fin flashes in place, along with the stencils on the fin, rudder and lifting points.
PIC 5. The underside decalled. There should be some stencils on the tail planes and elevators, but strangely, they aren't included on the kit's sheet, although most of the other stencils are.
PIC 6. The upper surface decals so far, with some of the stencils just visible. There are a few more stencils to apply, but these can't be done until after the code letters have been applied.
So, next job is to hand-paint over the decals on the sheet, using acrylic paint (ugh !) to avoid damaging the decals surface, then apply the code letters and remaining stencils. Then it's on the the rest of the construction stages.
Thanks again for your interest and comments, and I'll post some more pics soon.
 

Attachments

  • BoB Hurri build 110.jpg
    BoB Hurri build 110.jpg
    58.9 KB · Views: 79
  • BoB Hurri build 111.jpg
    BoB Hurri build 111.jpg
    46.8 KB · Views: 78
  • BoB Hurri build 112.jpg
    BoB Hurri build 112.jpg
    49.5 KB · Views: 75
  • BoB Hurri build 122.jpg
    BoB Hurri build 122.jpg
    36.2 KB · Views: 72
  • BoB Hurri build 114.jpg
    BoB Hurri build 114.jpg
    34.7 KB · Views: 75
  • BoB Hurri build 117.jpg
    BoB Hurri build 117.jpg
    28.7 KB · Views: 83
I've tried that before Andy. Unfortunately, accurate register is a problem, and the decals can have a tendency to wrinkle, like onion skin. Also, the ink is not very stable, and can easily come off in patches, or totally, the more the decal is handled or touched.
For the decal already in place, that will be painted -in with enamel paint, whilst those still on the sheet will be done in acrylics.
I had originally contemplated masking and painting the code letters, but in 1/48th scale,I think my hands might not let me achieve this accurately enough - maybe in 1/32nd scale I'll get away with it. And once I could hand-paint code letters freehand! Bl**dy arthritis!
I was fairly certain the decals would fade out, but knew I could use the outline as a sort of 'reverse template', to hand paint later. Just got to do the same on the 'White 6' and the white Tatzelwurm on the '109 now !!!
 

Users who are viewing this thread

Back