coming along nicely Dogsbody
Navigation
Install the app
How to install the app on iOS
Follow along with the video below to see how to install our site as a web app on your home screen.
Note: This feature may not be available in some browsers.
More options
You are using an out of date browser. It may not display this or other websites correctly.
You should upgrade or use an alternative browser.
You should upgrade or use an alternative browser.
**** DONE: Hurricane Mk1, L1807, DU-X, 312 (Czech)Sqn, RAF, October 1940 Group Build.
- Thread starter Airframes
- Start date
Ad: This forum contains affiliate links to products on Amazon and eBay. More information in Terms and rules
More options
Who Replied?- Thread starter
- #102
Airframes
Benevolens Magister
Thanks Wayne and Karl. Stalled again - feeling like sh*te after getting soaked the other day. Back to it tomorrow, all being well.
Take care mate....
- Thread starter
- #104
Airframes
Benevolens Magister
Thanks Wayne. Seem to be on the mend now - bl**dy weather !!
vikingBerserker
Lieutenant General
Dang man, hope you get to feeling better!
- Thread starter
- #106
Airframes
Benevolens Magister
Thanks David. Feeling a lot better now, but it's now 19.50 hours over here, and it's 'Bonfire Night', the celebration of Guy Fawkes' attempt to blow up Parliament (wish he could come back and have another go!), and the amount of fireworks and other pyro is like a re-enactment of the bl**dy Blitz ! What with that and Fire trucks causing havoc trying to get through narrow streets, the distraction is too much for concentrated modelling.
Hmm, what to do?
I know - PUB !!
I'm just stepping out - I may be gone some time!
Hmm, what to do?
I know - PUB !!
I'm just stepping out - I may be gone some time!


- Thread starter
- #108
Airframes
Benevolens Magister
My head hurts !
T Bolt
Colonel
Aspirin Terry. Aspirin and a lot of water. Best remedy for a trip to the Pub I've ever found!
seesul
Senior Master Sergeant
That´s a good sign Terry you´ve enjoyed last niteMy head hurts !
- Thread starter
- #112
Airframes
Benevolens Magister
Certainly did ! Took a long time to recover though - I must be out of practice, need to visit Talafa pub for some training!!
- Thread starter
- #113
Airframes
Benevolens Magister
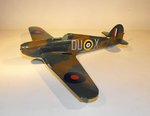
Well, the code letters are now done, although I'm not 100% happy with them. They'll have to do though, as I couldn't find any 1/48th scale grey codes in the right dimensions anywhere!
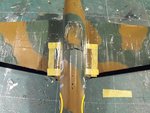
I ended up virtually hand-painting them, which took a number of hours, after first over-painting the home-made decals on the sheet. Once applied, they were, as I'd expected, a bit patchy. So, out with the pointy end of a Number 3 sable brush, and into the awkward angles on the fuselage, especially bl**dy awkward over the 'fabric ribbing' !
PIC 1. Before being able to apply some of the stencil decals, mainly those on the wing roots, I had to mask and paint the non-slip wing walk panels. The somewhat patchy, and yet to be re-touched code letter decals can just be seen here.
PIC 2. Once the code letters were as good as I was going to get them, the decal areas were given a coat of clear gloss. I'd used enamel gloss on the model prior to applying the decals, but I was dubious about using this over the un-painted serials, so used Klear (Future) instead. The bl**dy stuff reacted with two decals, home made and kit, causing a textured, bubbly look! Never had that happen before, but I think it should settle down once the matt clear goes on.
PIC 3. Whilst the decals/varnish were settling, some other jobs were started, including part masking the canopy, and beginning the first stage of painting the framework. As the frames were rather softly moulded in parts, I used the masks as a guide, applying the first coat of the interior colour, which was later given a second, tidier coat, followed eventually by two exterior colour coats. Once fully hardened, the canopy will be un-masked, dipped in Klear, and, once hardened, the frames will receive a matt coat.
All of that little lot took a total of about nine or ten hours, including starting work on the landing gear, wheels and prop.
I'll post some more soon, and thanks again for your interest.
Attachments
Crimea_River
Marshal
Looks good to me!
Vic Balshaw
Major General
Getting there Terry and it's looking good
T Bolt
Colonel
Real nice Terry. The codes look fine to me.
- Thread starter
- #117
Airframes
Benevolens Magister
Thanks very much guys. The codes aren't too bad, but the irregularities can be seen very close up, or through a magnifying glass, so only 90% acceptable to me.
- Thread starter
- #118
Airframes
Benevolens Magister
Got the matt clear coat done, and the final bits of construction are underway. With a bit of luck, it should be finished in time for the end of the GB. Pics in a day or so.
Vic Balshaw
Major General
Yes 'Chop Chop' mate only a few days to go.
lesofprimus
Brigadier General
Lookin good Terry, love the weathering on her bottom parts....
Users who are viewing this thread
Total: 1 (members: 0, guests: 1)