Good work so far Terry!
Navigation
Install the app
How to install the app on iOS
Follow along with the video below to see how to install our site as a web app on your home screen.
Note: This feature may not be available in some browsers.
More options
You are using an out of date browser. It may not display this or other websites correctly.
You should upgrade or use an alternative browser.
You should upgrade or use an alternative browser.
H.P. Halifax B.MkIII Dedication.
- Thread starter Airframes
- Start date
Ad: This forum contains affiliate links to products on Amazon and eBay. More information in Terms and rules
More options
Who Replied?looks great Terry
- Thread starter
- #223
Airframes
Benevolens Magister
Thanks guys. Not much to show, but now got all the engines in place, and the ailerons. Currently working on the canopy fit, and planning the method of making and fitting the multi-part fuselage bomb bay doors, which will be fitted after painting.
Off to the local art and crafts shop tomorrow, to check out casting resins and moulding materials, as I think it might be the easiest way to make 15 SBCs !
Off to the local art and crafts shop tomorrow, to check out casting resins and moulding materials, as I think it might be the easiest way to make 15 SBCs !
A4K
Brigadier General
Please do step by step on that if you do Terry!
Lucky13
Forum Mascot
1: Walk to off sales...
2: Buy suitable liquid...
3: Pay for suitable liquid...
4: Transport suitable liquid home...
5: Pick up some lady companionship on the way...
....
Looking forward to the rest old boy, carry on!
2: Buy suitable liquid...
3: Pay for suitable liquid...
4: Transport suitable liquid home...
5: Pick up some lady companionship on the way...
....
Looking forward to the rest old boy, carry on!
A4K
Brigadier General
Definitely DON'T want to hear any further steps if the 'female' companionship loosely implies a hippocrocofrog..!
- Thread starter
- #227
Airframes
Benevolens Magister
After a couple of days not feeling up to doing anything, I've finally made some headway, and, hopefully, got most of the repetitive correction work completed.
The moulds for this kit are really showing their age (although they've held up reasonably well over the last fifty years), as many of the smaller parts, such as the carb intakes and ailerons, have become 'soft' in their form and detail, requiring sanding, trimming and, in some cases, re-shaping.
After 'messing about' fitting the engines at something resembling the correct angle, quite some time was spent improving the carb intakes, and trimming here and there in order for them to fit onto the tops of the nacelles. Likewise, the ailerons needed a lot of work, sanding, thinning and adding the trim tab hinge lines, before cementing them in position. These were designed to be movable, and consequently, there are some gaps at the hinge line. Although not really noticeable, I might pack these with very thin strips of plastic, just to 'make sure'.
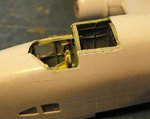
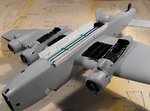
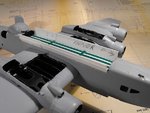
Most of the last two sessions has been spent test-fitting the vac-formed canopy, and calculating where, and how, cuts needed to be made around the cockpit edges. As I mentioned earlier, this cutting would normally be done before constructing the fuselage, but as I only received the canopy set and the cutting instructions after the main construction had been done, I was not aware of this. So, this then involved placing the canopy over the cockpit opening and, whilst trying to hold it roughly in place, marking the areas which would need to be trimmed or removed on the fuselage. The sequence, and end result, is illustrated below.
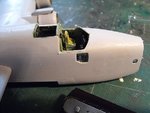
The eight sections of the fuselage bomb bay doors have also been made, from plastic card, and cemented into position, and again, this is shown below.
PICS 1 to 4. The required cut lines were first lightly scribed with the point of a scalpel blade, then the cuts were very carefully made, using a fine saw blade in a razor saw. Although only four cuts are shown here, there were in fact five separate cuts made, one each on the horizontal edges of cockpit and flight engineer's station, and a further cut, across the fuselage, at the rear of the engineer's compartment. After each cut, the canopy was placed in position, to check how it 'sat', then the next cut was made, repeating the test fitting, and so on.
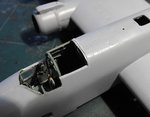
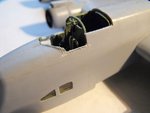
PIC 5. After all the cuts had been made, the canopy was again loosely placed in position, and then pressed into place by finger pressure, to ensure that, when the time comes to fit it, all the edges will 'seat' onto the fuselage edges. The canopy will be fitted after painting the model, as, due to using PVA with which to attach it, and the part being very thin, with minimal surface contact area, if it was fitted and masked, removing the masking will almost certainly remove the canopy also.
The canopy frames will either be made from painted strips of clear decal film, applying the interior colour first, followed by the relevant exterior colour, or, using a similar technique, the decal film will be replaced by clear tape.
PICS 6 and 7. The eight sections of the main bomb bay doors were cut from plastic card, using the scale plans, and the opening in the model's bomb bay, to check dimensions and shape, and then cemented into place. On the real aircraft, the larger, inner doors form the 'flat' bottom of the bomb bay and, when open, fold up inside the outer sections, which form the sides of the bay. The doors are also 'split' at the rear section, where the fuselage angles upward slightly towards the tail. This is the basic layout, and some internal detail, in the way of actuating rams and hinges,will be fitted later, along with a small amount of detail on the roof of the bay. As the vast majority of this area will not be seen once the model is on the display base, and also because some SBCs will probably be fitted into part of the bomb bay, detail here will be kept basic, and minimal.
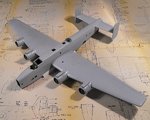
PIC 8. How the model looks to date, with all major components in place.
The next step is to take care of any sink marks, joints or other areas requiring filling, then apply a thick primer coat along the fuselage seams, before drilling holes for various antenna attachments. Once that's done, it'll be time to mask all the relevant openings, and start on the basic paintwork.
Total build time to date is now 76 hours, which gives some idea of the time and work required on a project such as this. I'm estimating that it'll take around another 30 to 35 hours to complete the model itself, with around a further 20 hours, possibly a bit less, to construct the diorama.
I'm going off to RAF Valley, on Anglesey, tomorrow (or rather, later today!), so I won't get any more done on the model until probably Friday evening, when I hope to make some rapid progress towards the painting and detailing.
Thanks very much again for all your kind comments, and I trust that this is continuing to be useful and interesting.
The moulds for this kit are really showing their age (although they've held up reasonably well over the last fifty years), as many of the smaller parts, such as the carb intakes and ailerons, have become 'soft' in their form and detail, requiring sanding, trimming and, in some cases, re-shaping.
After 'messing about' fitting the engines at something resembling the correct angle, quite some time was spent improving the carb intakes, and trimming here and there in order for them to fit onto the tops of the nacelles. Likewise, the ailerons needed a lot of work, sanding, thinning and adding the trim tab hinge lines, before cementing them in position. These were designed to be movable, and consequently, there are some gaps at the hinge line. Although not really noticeable, I might pack these with very thin strips of plastic, just to 'make sure'.
Most of the last two sessions has been spent test-fitting the vac-formed canopy, and calculating where, and how, cuts needed to be made around the cockpit edges. As I mentioned earlier, this cutting would normally be done before constructing the fuselage, but as I only received the canopy set and the cutting instructions after the main construction had been done, I was not aware of this. So, this then involved placing the canopy over the cockpit opening and, whilst trying to hold it roughly in place, marking the areas which would need to be trimmed or removed on the fuselage. The sequence, and end result, is illustrated below.
The eight sections of the fuselage bomb bay doors have also been made, from plastic card, and cemented into position, and again, this is shown below.
PICS 1 to 4. The required cut lines were first lightly scribed with the point of a scalpel blade, then the cuts were very carefully made, using a fine saw blade in a razor saw. Although only four cuts are shown here, there were in fact five separate cuts made, one each on the horizontal edges of cockpit and flight engineer's station, and a further cut, across the fuselage, at the rear of the engineer's compartment. After each cut, the canopy was placed in position, to check how it 'sat', then the next cut was made, repeating the test fitting, and so on.
PIC 5. After all the cuts had been made, the canopy was again loosely placed in position, and then pressed into place by finger pressure, to ensure that, when the time comes to fit it, all the edges will 'seat' onto the fuselage edges. The canopy will be fitted after painting the model, as, due to using PVA with which to attach it, and the part being very thin, with minimal surface contact area, if it was fitted and masked, removing the masking will almost certainly remove the canopy also.
The canopy frames will either be made from painted strips of clear decal film, applying the interior colour first, followed by the relevant exterior colour, or, using a similar technique, the decal film will be replaced by clear tape.
PICS 6 and 7. The eight sections of the main bomb bay doors were cut from plastic card, using the scale plans, and the opening in the model's bomb bay, to check dimensions and shape, and then cemented into place. On the real aircraft, the larger, inner doors form the 'flat' bottom of the bomb bay and, when open, fold up inside the outer sections, which form the sides of the bay. The doors are also 'split' at the rear section, where the fuselage angles upward slightly towards the tail. This is the basic layout, and some internal detail, in the way of actuating rams and hinges,will be fitted later, along with a small amount of detail on the roof of the bay. As the vast majority of this area will not be seen once the model is on the display base, and also because some SBCs will probably be fitted into part of the bomb bay, detail here will be kept basic, and minimal.
PIC 8. How the model looks to date, with all major components in place.
The next step is to take care of any sink marks, joints or other areas requiring filling, then apply a thick primer coat along the fuselage seams, before drilling holes for various antenna attachments. Once that's done, it'll be time to mask all the relevant openings, and start on the basic paintwork.
Total build time to date is now 76 hours, which gives some idea of the time and work required on a project such as this. I'm estimating that it'll take around another 30 to 35 hours to complete the model itself, with around a further 20 hours, possibly a bit less, to construct the diorama.
I'm going off to RAF Valley, on Anglesey, tomorrow (or rather, later today!), so I won't get any more done on the model until probably Friday evening, when I hope to make some rapid progress towards the painting and detailing.
Thanks very much again for all your kind comments, and I trust that this is continuing to be useful and interesting.
Attachments
-
 Halifax build 240.jpg48.7 KB · Views: 79
 -
 Halifax build 242.jpg52.6 KB · Views: 81
 -
 Halifax build 249.jpg43.3 KB · Views: 69
 -
 Halifax build 250.jpg39.6 KB · Views: 70
 -
 Halifax build 253.jpg36.8 KB · Views: 69
 -
 Halifax build 255.jpg54.4 KB · Views: 70
 -
 Halifax build 256.jpg49.7 KB · Views: 68
 -
 Halifax build 258.jpg65 KB · Views: 71
dirkpitt289
Master Sergeant
Nice work as always terry
Lucky13
Forum Mascot
Smashing old chap, top drawer!
A4K
Brigadier General
Even better than top drawer, table top old boy, what!
looks rather splendid old fruit !
Lucky13
Forum Mascot
Totally dogs and the cats sphericals old boy! Carry!
A4K
Brigadier General
Ruddy marvellous I say, Bwavo! Bwavo!
Lucky13
Forum Mascot
Looking right snappy there old chap, spiffy don't you know, the good old Queen is cheering you on as well, waving her knickers what!
A4K
Brigadier General
Adds a new meaning to 'Hello Kitty' what!
A4K
Brigadier General
Hey Wojtku! 

Looks good so far Terry!
Crimea_River
Marshal
You did a great job to make that vac form canopy fit Terry. Looked like t would be a challenge.
Users who are viewing this thread
Total: 1 (members: 0, guests: 1)