H.P. Halifax B.MkIII Dedication.

Ad: This forum contains affiliate links to products on Amazon and eBay. More information in Terms and rules

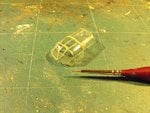
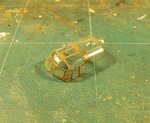
Thanks chaps. Not much more to show at the moment, as I've been working on making the moulds for the SBCs. Going to try to heat mould them, the same way as for canopies. If that doesn't work as well as I want it to, then I might resort to moulding from resin, or, as a last resort, make each one individually.
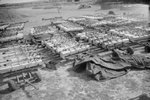
I'm hoping to get all the painting done over the weekend, and maybe start the decals. I'l be collecting the display base, which has been trimmed with wood by a friend, tomorrow, and should start the diorama ground work very soon.
Got 20 days in which to finish the whole lot - delivery is scheduled for September 7th !
 
Thanks Wayne - got a long weekend ahead of me, working flat out on this project. Bit of a hold up, as the LHS is closed for a week due to holidays, but I can continue with the other parts of the diorama, and mould the SBCs later (I hope!).
 
Sergio

SBC = Small Bomb Container
 

Attachments

  • mid.jpg
    mid.jpg
    20 KB · Views: 76
Thanks for the explanation I had not even crossed his mind.

I've been looking online and in the library I have about this gun, so I could see in the book of Lancaster Squadron Signal contenders these were very diferntes going container pumps 4 lb to 60lb.
if you do not want to complicate life for a long time the subject check out this link:

Relish Models - Relish Models Newsletter 29th March

Here are the mk45 to 500lb (presumably)

http://www.heritageaviationmodelsltd.com/cargo-containers-for-british-ww2-aircraft-x-15-195-p.asp
 
Last edited:
Thanks very much for that link Sergio! I'd been looking for the 'Belcher Bits' containers, but couldn't find any. A bit expensive, but probably work out only a touch more than making my own, and save a lot of time! Just ordered some, thanks!
 
Thanks very much Aaron. In the process of painting it at the moment, then start on the diorama base. Might have some pics tonight or tomorrow.
 
Just catching up on this again, Terry. Looking good in its primer state. Looking forward to the final push and the diorama in particular.

Cheers,

Gerry
 
Thanks very much Gerry. I've hit another set of delays - once again due to bl**dy Humbrol paint!
I painted the upper surfaces in Humbrol Dark Earth which, although it went on ok, took nearly all weekend to dry, having that sticky, 'rubbery' feel to it. I was eventually able to spray on the Dark Green, but this dried to a bright green finish, nothing like RAF Dark Green, and even different to the colour on the tin lid. Hornby really have messed up the Humbrol paint range, as the No. 30 Dark Green is way off compared to what it used to be. So, I brush-painted No.163 (Satin) Dark Green over this, only to have it dry a mix of gloss, matt and satin, and very patchy! I now have to re-paint this and will spray it this time, and hope it dries quickly enough for me to mask and paint the undersides.
I should have been well in to working on the base by now, with the model itself virtually done, apart from small detail parts. In an effort to save time (and temper!), I've gone against my usual practice, and stopped work on scratch-building the SBCs, and have ordered a set of the 'Belcher Bits' resin items, which should be here this week.
I still have enough time to get the diorama completed, but this latest set-back has really annoyed me, and taken the enjoyment of creativity away from this build. But, it has also spurred me to bite the bullet and order some replacement paints, and write (rather than e-mail) to Hornby, politely pointing out how inconsistent the Humbrol paint is, and how generally the quality is so bad.
On a more positive note, whilst waiting for the paint to sort itself out, I have been able to get a lot of preparation work done on the bomb load (except the SBCs) and bomb trollies, and have also finalised which ground crew figures need to be modified, and 'what goes where' in the diorama.
As soon as I have something worthwhile to show, I'll post some pics. Meanwhile, thanks again to you all for your continued support and interest.
 
Last edited:
Sorry to hear that my firend. These Humbrol enamels has started causing as many troubles as possible. I think it's time to switch to another colours.
 
Thanks my friend, and you're right. After using Humbrol for 50 years, it's time to look for better enamels. It's annoying, as they were once the best in the world, bar none, and I remember some of their advertising over the years, describing the formulation to allow quick drying, but thin and even coating, so as not to obscure detail, and their consistent good quality. Not anymore, it seems !!
 
I agree unfortunately. My old tins are still great, even the 15-20 year old pots, but new colours are crap from the start. So sad to see what they did to my favourite paint range.

Good on ya for writing to them btw, maybe more of us should do the same to help get the point across.
 
Yep... this is a shame we have to look for better enamels. I'm going to check on these ModelMaster II. My workmate who has been using them for a longer time, recommends them to me very offten.
 
Thanks for the support chaps! I think I will be changing, and Model Master are the paints I had in mind.

Anyway, I'm now back on track, more or less, with the general painting done and drying.The green is still slightly patchy, but a t least it no longer looks like marsh grass, and should even out once clear coated.
Here's the pics and a little explanation of a couple of things, aimed mainly at those who are following this thread as a tutorial.
PIC 1. Here, the patchy appearance of the dark green is quite apparent and, to be fair, is mainly caused by spraying a relatively small area in even smaller sections. With a larger area, where a wider nozzle setting could be used, the paint should dry with an even, satin finish. Although this should also be true if brush-painted over a larger, regularly shaped area, it rarely dries with an even finish. This will be lightly rubbed over with a soft, damp cloth, which tends to remove any 'dusty' deposits from suspended pigment and, once the gloss clear coat has been applied, and more so after the matt clear coat, any uneven blemishes should disappear.
The model has been masked here, ready for painting the black under side and fuselage colours, and this takes some time, as the angles and some narrow, 'tight' areas, mean that overspray is almost unavoidable, especially around the area of the twin fins. Time spent doing this is well worth the effort, and will ensure a good, clean, neat demarcation of colours, without the risk of areas of black 'mist' infringing onto the upper camouflage colours.
PICS 2 and 3. The main masking has been removed soon after painting, with the paint still only just 'tacky', as this minimises any lifting and feathering of the paint at the demarcation line. The model was not sprayed in pure matt black, as this would not only hamper any darker line work, such as panel and access hatch outlines, or the joints of the flaps beneath the wings, but it could also look too black, giving a 'flat', dead look to the finished model.
Instead, a little matt white was mixed with the matt black, to produce an 'off black', actually a very, very dark grey, which will give the model a more 'scale' appearance. This will also benefit any paint chipping or wear which may be added to the black areas, which can be toned down and not look too stark or artificial.
Once the paint has fully hardened, some very light panel line and hatch line work will be done, using a fine pencil, and a little dirt and staining added, particularly around the rear and lower areas of the engine cowlings. This will be kept to a minimum as, although these aircraft spent their entire operational life outdoors, in the unforgiving 'climate' of Yorkshire, especially over the winter period, this particular Halifax, serial number LK789, was just under three months old at the time depicted, and had completed 11 Operational sorties between delivery in February 1944, and it's loss, near Cambridge, on 24 April.
Other detail painting will also be carried out at this time, with the exception of the exhaust collector rings, which will be painted after the matt clear coat has been sprayed.
Once this work is completed, the model will be given a gloss clear coat, and then the decals will be applied. Only the upper wing roundels, and one set of fin flashes will be used from the kit decal sheet. The fuselage roundels are out of register, and these will be replaced by roundels from the spares files, and the inner fin flashes will also be sourced from here (only one set of fin flashes are provided, as the kit's decals include yellow I.D. stripes for the outer fins.) Code letters (MP-L) will be from 'Modeldecal', the yellow 'bomb tally' adapted from the spares files, and the serial number will be home made. This will be an interesting exercise, as the Halifax serial numbers were applied as a decal, red on black, with the surround visible at close quarters or in certain lighting conditions. After umpteen years of striving to ensure decal surrounds disappear on models, I now have to ensure that these are visible!
With the decals applied, another gloss coat will be sprayed, to act as a sealer and ensure an even appearance overall, and then this will be followed by a matt clear coat, but this will all be explained at that stage.
PICS 4 and 5. The vac-form canopy, having been trimmed and sanded around the edges as required, and test-fitted to check for any gaps, and the best areas of contact, was washed in a weak solution of tepid water and washing-up liquid, then thoroughly rinsed. This removes any release agent, and grease from handling, and the difference is very noticeable once dried and lightly polished with a soft cloth.
Note the term 'best areas of contact' - vac-formed canopies are, by their very nature, thin and flexible, and will not locate and fit as positively as a thicker, injection moulded part. Therefore, it is a good idea, when test fitting, to note those areas around the edges of the part, which will offer the best area of most contact, where adhesive can be applied to hold the part in place.
The part can be tacked in place with CA adhesive, and then sealed with PVA or Micro 'Kristal Klear', but, even if dipped in 'Future', there is a risk that the fumes from CA may fog the canopy.
Also, and especially in this case, where the fuselage was cut after joining, the canopy can not always be expected to fit perfectly, all round, and remain correctly seated whilst being fitted into place. The countless test-fitting exercises will show where any gaps may need attention, if any, once the canopy has been fitted and has set.
In this case, with the Halifax having an offset cockpit rim, the 'seating' of the canopy will be more awkward than, say, that of a fighter, where an even amount of support all around would be provided by the fuselage. What I intend to do is use a very small drop of CA, applied with the tip of a pin, at the point where the wider frame on the port side joins with the bulkhead between cockpit and engineer's compartment. Once this has set, holding the canopy more or less in position, 'Kristal Klear' will be applied, working in stages, around the remaining edges, holding the part in place at each stage, until the canopy is fully seated and aligned correctly. Once set, any remaining gaps can then be filled with further applications of 'Kristal Klear', and re-touched as required.
With the canopy firmly in place, I would normally then fit the 'frames', and would use clear tape to do this. The tape is first lightly pressed onto a suitable clean, flat surface, and I normally use an old, glass drinks coater. The interior colour is painted first, covering a length of tape and, when fully dry, the exterior colour is then painted on, covering the earlier coat. When the paint is dry, strips of tape of the required width are carefully cut, using a new blade in the scalpel, and then pressed onto the required area of the canopy. Once satisfied that these strips are where you want them to be, they can then be pressed down firmly, any excess trimmed off, and then sealed with a gloss clear coat overall. If a matt, semi-matt or other finish is needed on the frames themselves, this can be applied with a fine brush once the gloss clear has fully dried.
BUT! When I closely examined the Halifax canopy, I found that the frame detail was of the raised variety in this instance, which would mean it would be extremely difficult to apply very narrow strips of tape to the frame areas, and hope that they would adhere, and align with the moulded detail!
So, it was a case of having to paint the frames, in the same sequence as would be used for painted tape, and hope that the paint would adhere properly. (paint very often will not 'take' very well on vac-formed canopies, and normally requires a number of coats.)
Using a 000 fine lining brush, the interior colour (Humbrol No78 Cockpit Grey-Green, slightly lightened with a couple of drops of white) was painted free hand, carefully and slowly, not worrying too much about any slight imperfections, which could be 'straightened' by the use of a wooden cocktail stick, the tip of which was dampened with white spirit. This took about one hour !
When the interior colour was dry, the exterior colours were painted in the same way, and this proved a little easier, as the interior colour acted as a primer-undercoat, allowing the paint to 'key' much easier.
The pics show the canopy after the application of the interior colour, and with the exterior camouflage colours applied, although in the latter shot, the edges have yet to be straightened. Once the canopy has been firmly attached to the model (which will be after the matt clear has been sprayed on the model), the frames will be brushed with the matt finishing coat.
So, that's where things are at up to now, and I hope the explanation of the work involved will be useful to some, interesting to others, and amusing to those who know who you are!
With the model now painted, I hope to make some fairly rapid and noticeable progress within the next week, and I'll post further up-dates as and when things are completed.
Thanks once again for your kind comments and support.
 

Attachments

  • Halifax build 262.jpg
    Halifax build 262.jpg
    108.4 KB · Views: 80
  • Halifax build 263.jpg
    Halifax build 263.jpg
    100.8 KB · Views: 72
  • Halifax build 266.jpg
    Halifax build 266.jpg
    102.1 KB · Views: 77
  • Halifax build 261.jpg
    Halifax build 261.jpg
    76.4 KB · Views: 90
  • Halifax build 268.jpg
    Halifax build 268.jpg
    73 KB · Views: 86

Users who are viewing this thread

Back