Navigation
Install the app
How to install the app on iOS
Follow along with the video below to see how to install our site as a web app on your home screen.
Note: This feature may not be available in some browsers.
More options
You are using an out of date browser. It may not display this or other websites correctly.
You should upgrade or use an alternative browser.
You should upgrade or use an alternative browser.
DONE: 1/32 Hasegawa Ki-84, 57th Shimbu-Tai - Group Build
- Thread starter Wayne Little
- Start date
Ad: This forum contains affiliate links to products on Amazon and eBay. More information in Terms and rules
More options
Who Replied?lesofprimus
Brigadier General
WOW....
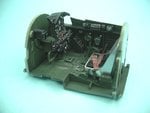
Cockpit looks insane and the panel is straight up tits man....
Cockpit looks insane and the panel is straight up tits man....
- Thread starter
- #83
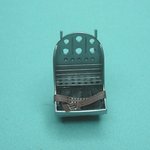
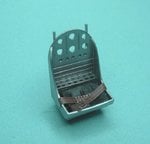
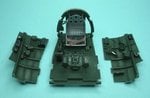
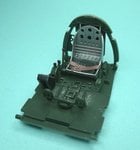
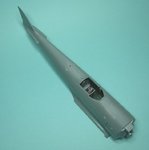
Thanks fellas....done the seat now too...
Again actual colour is....well pretty much unknown? Green, Metallic green/Blue, NMF/Silver? probable options, decided on NMF/Silver just to brighten it up a bit.
One original seat shows a odd very light colour peeling off a NMF seat in a restored aircraft, hard to know if this light colour is original or added later....and degraded over time?
Attachments
ozhawk40
Master Sergeant
Great seat Wayne. Can you put some words down on how you did the belts and cushion?
Cheers
Peter
Cheers
Peter
Airframes
Benevolens Magister
Beauty Wayne, and please tell me that belt and cushion aren't scratch-built!
If it's any help, I saw an article a couple of years back, where some guy had really gone to town on a 1/32nd Zero. OK, not the same type, but his research had shown that the seat on the real aircraft, supplied form a particular sub-contractor (I think), at that time was in bare metal.
If it's any help, I saw an article a couple of years back, where some guy had really gone to town on a 1/32nd Zero. OK, not the same type, but his research had shown that the seat on the real aircraft, supplied form a particular sub-contractor (I think), at that time was in bare metal.
") (I got to have somebody to pick on
(I got to have somebody to pick on - Thread starter
- #88
Great seat Wayne. Can you put some words down on how you did the belts and cushion?
Cheers
Peter
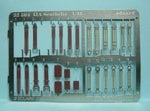
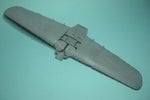
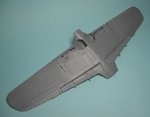
The cussion was a resin piece that just slotted in....painted Semigloss black for a slight shine then drybrushed with light grey to tone it down..the seat belts....even easier Eduard seat belt set!
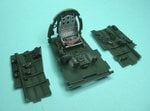
...and some shots fitted to the floor...
Thanks for the info Terry!
Attachments
Last edited:
lesofprimus
Brigadier General
Damn, its lookin good...
Catch22
Major
Looks great Wayne!
trackend
Chief Master Sergeant
That is some work WL Im going to have to study your posts very carfully before I start doing some building.
vikingBerserker
Lieutenant General
The talent some of you fellas have just blows my mind, DAM!
unbelivably good Wayne
- Thread starter
- #96
Catch22
Major
Wow...
Airframes
Benevolens Magister
Man that looks good!
- Thread starter
- #99
Airframes
Benevolens Magister
It's that sudden progress stage, when it starts looking like an aeroplane instead of a pile of bits - nice work Wayne.
Users who are viewing this thread
Total: 1 (members: 0, guests: 1)