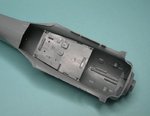
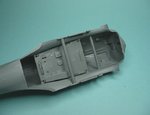
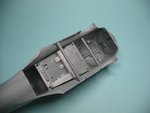
DONE: 1/32 Hasegawa Ki-84, 57th Shimbu-Tai - Group Build (1 Viewer)

Ad: This forum contains affiliate links to products on Amazon and eBay. More information in Terms and rules

now when you fit your cockpit into the fuselage...it's always a good idea to dry fit everything and in this case check the wing fit too....

In this case it is not as good as I thought it would be...have glued the fuselage without glueing the cockpit at all, it simply went in real clean and snug thus allowing the opportunity to 'spread' the fuselage slightly to get a nice clean fit to the wings....to be done next in the process.

Sometimes you can and should glue your cockpit to one side of fuselage and not the other so you still have the back up of spreading the fuselage if necessary.....

So just in case some didn't download the 'Spacer' PDF here it is again for your reference and use.
 

Attachments

  • Cockpit in Fuselage_5565.JPG
    Cockpit in Fuselage_5565.JPG
    39.7 KB · Views: 111
  • Fuselage to wing_5566.JPG
    Fuselage to wing_5566.JPG
    29.6 KB · Views: 103
  • Fuselage to Wing_5567.JPG
    Fuselage to Wing_5567.JPG
    33.8 KB · Views: 98
  • Construction Problem_Gaps Spacers.pdf
    497.2 KB · Views: 98
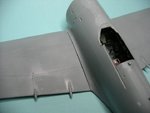
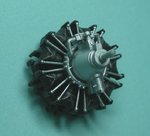
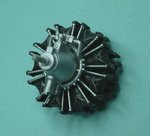
looks great Wayne, i'm sure that gap will vanish soon !!!!

Yep!..:D

Spacers in place wing attached....and no more gap!
 

Attachments

  • Wing joint_5572.JPG
    Wing joint_5572.JPG
    36 KB · Views: 109
  • Wing joint_5617.JPG
    Wing joint_5617.JPG
    30.1 KB · Views: 131
  • Wing joint_5615.JPG
    Wing joint_5615.JPG
    32.2 KB · Views: 115
  • Spacers_5569.JPG
    Spacers_5569.JPG
    35.1 KB · Views: 971
  • Spacers_5568.JPG
    Spacers_5568.JPG
    34.9 KB · Views: 116
Looks like an aircraft now.....working on tidying up the seams etc.
 

Attachments

  • Main Body Assy_5574.JPG
    Main Body Assy_5574.JPG
    32.6 KB · Views: 102
  • Main Body Assy_5576.JPG
    Main Body Assy_5576.JPG
    45.2 KB · Views: 105
  • Main Body Assy_5578.JPG
    Main Body Assy_5578.JPG
    37.5 KB · Views: 94
still working on seams and the like, but have been preping the engine as well...
 

Attachments

  • Engine_5559.JPG
    Engine_5559.JPG
    44.2 KB · Views: 94
  • Engine_5560.JPG
    Engine_5560.JPG
    50 KB · Views: 100
  • Engine_5561.JPG
    Engine_5561.JPG
    52.3 KB · Views: 96

Users who are viewing this thread

Back