NICE!
Navigation
Install the app
How to install the app on iOS
Follow along with the video below to see how to install our site as a web app on your home screen.
Note: This feature may not be available in some browsers.
More options
You are using an out of date browser. It may not display this or other websites correctly.
You should upgrade or use an alternative browser.
You should upgrade or use an alternative browser.
**** DONE: 1/48 CAC CA-13 Boomerang - Aircraft Nose Art GB.
- Thread starter ozhawk40
- Start date
Ad: This forum contains affiliate links to products on Amazon and eBay. More information in Terms and rules
More options
Who Replied?Airframes
Benevolens Magister
Great stuff Peter, really looks the biz. You can lighten the photos, to show the detail better, by using the Gamma adjustment feature in 'Irfanview'.
Quick question regarding the instrument decals from Fantasy Printshop - are they printed as individual instrument decals, that is, on separate carrier film per instrument, or do you need to cut around each decal?
Been thinking of getting some, but, if they're like the old Waldron decals, I don't want to have to pay £80+ for a punch set!
Good work so far Peter!
Crimea_River
Marshal
Looks good. I would have never installed that frame like that based on the instructions.
T Bolt
Colonel
Vic Balshaw
Major General
Think you nailed it there Peter, looks good.
N4521U
Plastic Pirate
Great stuff Peter, really looks the biz. You can lighten the photos, to show the detail better, by using the Gamma adjustment feature in 'Irfanview'.
Quick question regarding the instrument decals from Fantasy Printshop - are they printed as individual instrument decals, that is, on separate carrier film per instrument, or do you need to cut around each decal?
Been thinking of getting some, but, if they're like the old Waldron decals, I don't want to have to pay £80+ for a punch set!
I don't think I paid THAT much. Micro Mark I think I paid 40 a couple of years back, sometimes they have a half price sale. Micro Punch Set
Peter, you're doin good..... don't you hate it tho when you compare the kit and the real thing and they just don't match????! The square top of the panel and the drooping sides of the kit. Unless they are two different models of the plane.
parsifal
Colonel
Nice work Peter, real nice. i had a lot of trouble with that lower part of the IP, but got there eventually. 1/48 seems to have a lot of nice detail
- Thread starter
- #90
ozhawk40
Master Sergeant
Great stuff Peter, really looks the biz. You can lighten the photos, to show the detail better, by using the Gamma adjustment feature in 'Irfanview'.
Quick question regarding the instrument decals from Fantasy Printshop - are they printed as individual instrument decals, that is, on separate carrier film per instrument, or do you need to cut around each decal?
Been thinking of getting some, but, if they're like the old Waldron decals, I don't want to have to pay £80+ for a punch set!
Cheers Terry - The decals I have are printed as individual, so no punch required. I also have the placard set, and that's very useful too.
- Thread starter
- #91
ozhawk40
Master Sergeant
Peter, you're doin good..... don't you hate it tho when you compare the kit and the real thing and they just don't match????! The square top of the panel and the drooping sides of the kit. Unless they are two different models of the plane.
Cheers Bill. They are slightly different. There are two boxing's of this kit, the CA-12 and this one the CA-13, but I believe the panel remained unchanged over boomerang production. In fact whilst there is a lot of detail packed in some of it is a bit off - probably to allow for the thickness of the plastic to represent the fuselage sides.
That brings me to my next update.
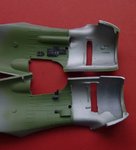
Pic 1, 2 3
Here you can see photo etch seat belts added to the seat and attached to the cockpit, along with the armored seat back and frame.
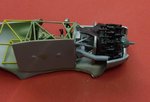
Pic 4,5,6
I've arrowed part C26, which represents ducting from the lower cowl vent. After completing the engine it became evident that there was no way this part could remain in place, as it interferes with the lower cylinders. In addition the cowling is still too narrow to allow a proper fit, even with the extra width put in. You can either make the cowling wider by slimming down the insides, or alternatively reducing the width of the engine. I elected to thin the cowling sides. So......out with the Dremel 4000.
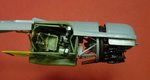
The fuselage plastic is very thick and you can do a lot of slimming without too much worry. I just made sure the plastic did not heat up too much during the process. There were two indents in the side of the cowl each side and I thinned them down so that these indents disappeared.
Final pic shows the result. I had already painted the forward inner cowl aluminum, and will need to smooth and reapply once I am happy with the fit.
Cheers
Peter
Attachments


Lucky13
Forum Mascot
Airframes
Benevolens Magister
Nicely done Peter.
Great work so far Peter!
sweet man...
- Thread starter
- #97
ozhawk40
Master Sergeant
Thanks guys
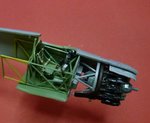
After lots of trial fits, both the cockpit tube assembly and the engine assembly now fit within the confines of the fuselage - at last! Not without casualty though, there was simply no room for the port side interior console and the fuselage framing. It's a pity, but I could not find a way, unless I hacked it to bits or took to the side with the Dremel, thus destroying the side wall detail. The designers of this kit did well, but they got 95% of the way and didn't correct the glitches in measurements. In Special Hobby's defense, the kit is much better than anything else before it in 1/48. Okay, you will also note the gap between the engine mounts and the firewall, which does close up once both halves of the fuselage are added. I have also re-painted the exhaust and the brush painted MM burnt iron looks good over dk brown. No need to spray that stuff as per instructions, if you have a dark base coat.
Cheers
Peter
After lots of trial fits, both the cockpit tube assembly and the engine assembly now fit within the confines of the fuselage - at last! Not without casualty though, there was simply no room for the port side interior console and the fuselage framing. It's a pity, but I could not find a way, unless I hacked it to bits or took to the side with the Dremel, thus destroying the side wall detail. The designers of this kit did well, but they got 95% of the way and didn't correct the glitches in measurements.
In Special Hobby's defense, the kit is much better than anything else before it in 1/48. Okay, you will also note the gap between the engine mounts and the firewall, which does close up once both halves of the fuselage are added. I have also re-painted the exhaust and the brush painted MM burnt iron looks good over dk brown. No need to spray that stuff as per instructions, if you have a dark base coat.Cheers
Peter
Attachments
Airframes
Benevolens Magister
Looking the biz Peter.
parsifal
Colonel
Its got similar issues to the 1/72 cousin I think Peter. I recall having the same frsutrations with my kit. Really nice detailing, and mostly everything fits, but there just doesnt seem enough room to fit the innards into the available space. I found the plastic to be very thick and hacked away with the dremel to make it all fit and then had to use some really brutal clamping to make it all come together.
They are nice kits, with a lot of great detail, but you would think they would get the basic fit right as well....
I forgot to add... its very nice work you are doing IMO
They are nice kits, with a lot of great detail, but you would think they would get the basic fit right as well....
I forgot to add... its very nice work you are doing IMO
Users who are viewing this thread
Total: 1 (members: 0, guests: 1)