Navigation
Install the app
How to install the app on iOS
Follow along with the video below to see how to install our site as a web app on your home screen.
Note: This feature may not be available in some browsers.
More options
You are using an out of date browser. It may not display this or other websites correctly.
You should upgrade or use an alternative browser.
You should upgrade or use an alternative browser.
**** DONE : 1/48 Hellcat Mk I JV-131 No 800 Squadron HMS Emperor (1 Viewer)
- Thread starter Crimea_River
- Start date
Ad: This forum contains affiliate links to products on Amazon and eBay. More information in Terms and rules
More options
Who Replied?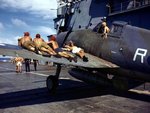

- Thread starter
- #62
Crimea_River
Marshal
Thanks Cory. I was editing this post when you responded. Photos would be nice if you have them but my bird will be representing ETO during D-Day Channel ops.
- Thread starter
- #63
Crimea_River
Marshal
D'oh. Crossed threads again! Thanks buddy!
Matt308
Glock Perfection
The third pic looks familiar.
Catch22
Major
Not a problem!
And yes, I know your bird will be ETO, but unfortunately PTO is all I have!
Crossed posts Matt.
I've posted these in numerous threads. It's easier just to re-upload them than to find where I've posted them previously.
And yes, I know your bird will be ETO, but unfortunately PTO is all I have!
Crossed posts Matt.
I've posted these in numerous threads. It's easier just to re-upload them than to find where I've posted them previously.
Airframes
Benevolens Magister
I think I've seen a pic of an ETO bird with the tank. I'll have a look through my stuff and see what I can find.
Airframes
Benevolens Magister
Found one pic so far, with Hellcats onboard 'Emperor', with drop tanks on the centreline. This was during Norwegian operations, I'll post it later today. I'm still looking for a pic with D-day stripes and tanks.
I think your logic is sound though Andy - if they were flying long, standing patrols, they'd probably have the tanks.
I think your logic is sound though Andy - if they were flying long, standing patrols, they'd probably have the tanks.
- Thread starter
- #68
Crimea_River
Marshal
Thanks Terry. No problem if you can't find the pics. Pretty much decided to install the tank anyway.
dirkpitt289
Master Sergeant
Phenomenal work Andy
lesofprimus
Brigadier General
Engine looks good Andy, keep on her..
- Thread starter
- #71
Crimea_River
Marshal
Thanks Dan and Dirk
The rest is going together quickly. After a little setback losing a PE piece that goes across the rear cockpit window, the fuselage halves are now together and drying as are the tailplanes. Will likely do the wings tomorrow night then assemble the major chunks before the weekend.
The rest is going together quickly. After a little setback losing a PE piece that goes across the rear cockpit window, the fuselage halves are now together and drying as are the tailplanes. Will likely do the wings tomorrow night then assemble the major chunks before the weekend.
Doin' some nice work there Andy!
ozhawk40
Master Sergeant
Wow. Great result on the cockpit and engine detail Andy. I always have trouble gluing those small bits and piece of PE down - you have done a great job. Keep going 8)
Cheers
Peter
Cheers
Peter
- Thread starter
- #75
Crimea_River
Marshal
Thanks again guys.
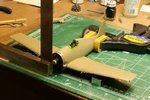
A couple more progress shots. The kit's detail for attaching the wings and tailplanes is a simple recess in the fuselage. No slots and tabs here so extra attention needs to be paid to making sure enough surfaces see glue and to getting the dihedrals right.
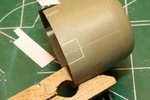
The first pic shows the rudimentary setup I used to get the fuselage squared up and the wings correctly attached. First, the fuslelage was clamped so that the vertical axis was exactly perpendicular to the working surface. This was checked with a square placed as shown and lining up the vertical seam on the fuselage with the edge of the square by eye. Next the wings were inserted into the fuselage recesses and 1/2" spacer blocks placed under the wings at the right locations to get the desired dihedral. These can be seen just outboard of the guns. Once this rickety setup was achieved, I ran a line of ProWeld liquid glue along the top of the wing/fuselage joint to get an initial set. Once dry, I ran another line and then did the same underneath. Apart from a small gap that will need a bit of putty, the joints turned out pretty nice. Once the wings were done, a similar setup was used to glue the tailplanes on to be perfectly horizontal.
The cowl flaps provided with the kit are molded closed but I want mine to be slightly open. The next two pics show my attempt at sawing the flaps and then bending them open slightly. These are a bit wierd because of the curvature at the hinged edge which fights the needed bending. On the real bird, because the flaps are so large, they must have partly tucked underneath the engine cowl. The kit flaps being very thick, I began thinning the plastic around the edges of the flaps with my Dremel tool. Part way through, I didn't like what I was seeing and decided to revert to a different plan. I ended up cutting the flaps off completely and will make some from scratch using plastic card. This will be my weekend project.
Thanks for your continued interest!
A couple more progress shots. The kit's detail for attaching the wings and tailplanes is a simple recess in the fuselage. No slots and tabs here so extra attention needs to be paid to making sure enough surfaces see glue and to getting the dihedrals right.
The first pic shows the rudimentary setup I used to get the fuselage squared up and the wings correctly attached. First, the fuslelage was clamped so that the vertical axis was exactly perpendicular to the working surface. This was checked with a square placed as shown and lining up the vertical seam on the fuselage with the edge of the square by eye. Next the wings were inserted into the fuselage recesses and 1/2" spacer blocks placed under the wings at the right locations to get the desired dihedral. These can be seen just outboard of the guns. Once this rickety setup was achieved, I ran a line of ProWeld liquid glue along the top of the wing/fuselage joint to get an initial set. Once dry, I ran another line and then did the same underneath. Apart from a small gap that will need a bit of putty, the joints turned out pretty nice. Once the wings were done, a similar setup was used to glue the tailplanes on to be perfectly horizontal.
The cowl flaps provided with the kit are molded closed but I want mine to be slightly open. The next two pics show my attempt at sawing the flaps and then bending them open slightly. These are a bit wierd because of the curvature at the hinged edge which fights the needed bending. On the real bird, because the flaps are so large, they must have partly tucked underneath the engine cowl. The kit flaps being very thick, I began thinning the plastic around the edges of the flaps with my Dremel tool. Part way through, I didn't like what I was seeing and decided to revert to a different plan. I ended up cutting the flaps off completely and will make some from scratch using plastic card. This will be my weekend project.
Thanks for your continued interest!
Attachments
Airframes
Benevolens Magister
Some nice precision work there Andy, good work mate.
Yeah...doing great man!
- Thread starter
- #78
Crimea_River
Marshal
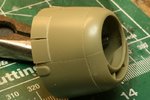
More work on the engine cowl:
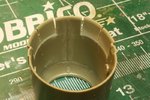
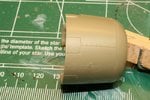
Pic 1As stated above, I got rid of the cowl flaps in favour of using scratch built ones from plastic card. To do this, I had to thin the walls of the engine cowl where the flaps would attach. The edge on the left is as supplied in the kit, quite thick. The edge on the right has been ground thin using my Dremel tool.
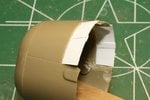
Pics 2 and 3 show the finished plastic card cowl flaps installed. I'm fairly happy with the result.
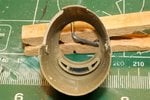
Pic 4 The cowl flaps were controlled with small actuators that pierced the outer skin under the flaps. I drilled some holes and glued in some stretched sprue, seen here in 4 locations, one for each flap. These will be carefully trimmed to the correct length when the cowl is installed.
When contemplating whether or not to open the oil cooler cowl flaps on the underside, I discovered an error on the Eduard instruction sheet. Only some of the Hellcats had these flaps and the rig that I'm doing, in hindsight, does not have them according to the profile (page 1). The kit is provided with two styles of cowl, one with the flaps and one without and the intruction sheet tells me to use the ones with the flaps. Since I already glued on the front section and having cut off the kit flaps, I decided to continue and just fix this.
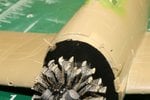
Pic 5 shows the kit-supplied cowl with the oil cooler flaps shown. In Pic 6, I've filled in the panel lines for the flaps and scribed the continuation of the panel line and added more rivets.
Next up will be painting the interior of the cowl and gluing it to the fuelage - tomorrow! Thanks for looking in.
Pic 1As stated above, I got rid of the cowl flaps in favour of using scratch built ones from plastic card. To do this, I had to thin the walls of the engine cowl where the flaps would attach. The edge on the left is as supplied in the kit, quite thick. The edge on the right has been ground thin using my Dremel tool.
Pics 2 and 3 show the finished plastic card cowl flaps installed. I'm fairly happy with the result.
Pic 4 The cowl flaps were controlled with small actuators that pierced the outer skin under the flaps. I drilled some holes and glued in some stretched sprue, seen here in 4 locations, one for each flap. These will be carefully trimmed to the correct length when the cowl is installed.
When contemplating whether or not to open the oil cooler cowl flaps on the underside, I discovered an error on the Eduard instruction sheet. Only some of the Hellcats had these flaps and the rig that I'm doing, in hindsight, does not have them according to the profile (page 1). The kit is provided with two styles of cowl, one with the flaps and one without and the intruction sheet tells me to use the ones with the flaps. Since I already glued on the front section and having cut off the kit flaps, I decided to continue and just fix this.
Pic 5 shows the kit-supplied cowl with the oil cooler flaps shown. In Pic 6, I've filled in the panel lines for the flaps and scribed the continuation of the panel line and added more rivets.
Next up will be painting the interior of the cowl and gluing it to the fuelage - tomorrow! Thanks for looking in.
Attachments

vikingBerserker
Lieutenant General
Nicely done!
Great work Andy...nicely done mate!
Users who are viewing this thread
Total: 2 (members: 0, guests: 2)