**** DONE: 1/48 P-38J Lightning 44-23675 "Les Vin, Les Femmes, et Les Chansons" (1 Viewer)

Ad: This forum contains affiliate links to products on Amazon and eBay. More information in Terms and rules
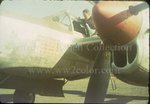
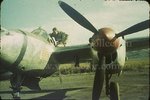
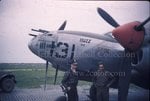
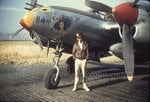
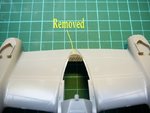
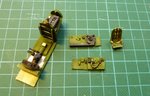
Nice one Pete, the P-38 rate as one of my all time favourites and I'm yet to have the fun of building one.

:hotsun: :hotsun:
 
Yes Harrison, that's the one - cheers. At the moment I'm trying to find out as much as I can about Major Paul Sabo. He certainly had an interesting time in the service - started his flying career as a "Flying Sergeant".

I'm also trying to confirm the colour of the anti-glare panels on the nose and nacelles. Most colour photos I have found of p-38J's show olive drab, but some of the profiles show black. Anybody have a way to tell from the serial?

I'll make a start soon, but I'm waiting on some goodies to arrive in the post. 8)
 
Not sure about black anti-glare panels, although it's possible. Generally, black wasn't used until post war, but that's not to say it wan't used in late WW2. However, I've seen profiles of aircraft with black panels, when colour pics of the original have shown OD. It might be that some artists interpret a very dark looking OD in B&W pics as black?
 
Yes Terry, I think the same also. However there are a few that are definitely black, but when?

Here's a selection of contemporary photos from the Jeff Ethell Collection - ww2color website.

Couple of famous planes in the bunch too!

I'm leaning towards drab.
 

Attachments

  • 03648.jpg
    03648.jpg
    52.6 KB · Views: 182
  • 03649.jpg
    03649.jpg
    64.9 KB · Views: 187
  • 06610.jpg
    06610.jpg
    62.5 KB · Views: 188
  • 06618.jpg
    06618.jpg
    82.3 KB · Views: 246
  • 06648.jpg
    06648.jpg
    57.1 KB · Views: 191
  • 06652.jpg
    06652.jpg
    50.6 KB · Views: 171
  • 07283.jpg
    07283.jpg
    68 KB · Views: 209
  • p38-7.jpg
    p38-7.jpg
    73.9 KB · Views: 222
I'll also post the paint instructions. These call for the anti-glare panel to be flat black.

I found a profile in the Osprey series on European P-38 Aces - here it is with flat black panels.

Finally here is a photo taken at Florennes.

Incidentally, this ship has been attributed two serial numbers 44-23624 and 44-23675. Both are P-38J-25 LO models, which is interesting. From my understanding, these late model J's were almost the same as the L model, having the "dive flaps" and leading edge landing lights. It is probably better to use a P-38L to represent this aircraft!

Cheers

Peter
 

Attachments

  • P38J -25 44-23675 Sabo at Florennes 2 - resized.jpg
    P38J -25 44-23675 Sabo at Florennes 2 - resized.jpg
    49.4 KB · Views: 210
  • Osprey profile 44-23624.jpg
    Osprey profile 44-23624.jpg
    30 KB · Views: 376
  • hasegawa profiles.jpg
    hasegawa profiles.jpg
    202.7 KB · Views: 204
Great pics Peter - but, they all have dark OD anti-glare panels!!
I've since found one colour pic which appears to show black on the nacelle nose and the engine top nacelles, on a UK-based F5 in natural metal. But, a close up of what might be the same aircraft, shows the port engine top cowling actually being painted - in Olive Drab!
 
beautiful score on the '38. but might I suggest when you come to the D-day stripes decals, don't use them. I recommend you hand paint them to make it look more realistic. cos the D-day stripes were painted on using brooms, mops, etc. they were all very unneat since they were painted on overnight
 
Thanks Trebor. Pics of 370th ships around the 6th June do show some very roughly painted stripes. I'm not sure when this ship came on strength, but later, the stripes were painted very neatly, and only on the bottom half of the wings and booms. I now have several good photos of the nose art, but not one of the complete aircraft to check this out. I intend to spray paint the stripes and not use the decals. Let's see how I go!

Cheers

Peter
 
The wait is over!

The postman made a delivery today and so now I'm set to make a start. I've amended my first post to include these items

True Details Cockpit,
True Details Resin Wheels,
Master brass gun barrels, and;
Eduard Masks

Now it's time for rolling up the sleeves dusting off the brushes and cracking open a tinny - or three.
 

Attachments

  • accessories - resized.jpg
    accessories - resized.jpg
    106.7 KB · Views: 188
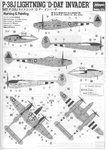
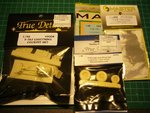
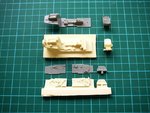
Well .....no actually. I was tempted with getting a resin engine or two, some of those white metal undercarriage legs thingos and a vacuum formed canopy or two. Good thing I have great self control.
:lol::lol::lol:

Cheers

Peter

Well yeah..but you seem to have lost it for a second when you got all of those :lol:

Nice stuff!
 
Hi guys. Finally got around to making a start on this one.

Pic 1: This is the True Details cockpit resin compared to the kit parts. True Details are very much better in terms of detail. This is the first time I have done a full resin cockpit and it was a bit of an experience, with considerable fitting and refitting of all the parts until they fit well. The True Details resin, although tailored for the Hasegawa was a little big in terms of the seat back, and a little too far back in the cabin, making the canopy fit difficult.

Pic 2: Had to cut out a big part of the rear cockpit, a step not explained in the resin instructions.

Pic 3: Painted up and looking just about done. The seat came out real well, so I'm happy about that. I usually use the etch belts, but the resin can look just as good. I used Japanese Army green as a base, over sprayed with interior green, and then detailed and dry-brushed. the high and low areas. Headrest in brown 'leather', but could have been black. Seat frame is aluminium, but the photos make it look a bit different. You'll see it better in later updates.

Pic 4: Main undercarriage leg axles were hollow, so they were drilled out for that bit of extra realism. They will be painted neutral gray along with the interior of the wheel bays. Going to add some brake lines too, when the wheels are on.

Over and out. 8)

Cheers

Peter
 

Attachments

  • cockpit 001 - resized.jpg
    cockpit 001 - resized.jpg
    123.1 KB · Views: 154
  • cockpit 002 - resized.jpg
    cockpit 002 - resized.jpg
    72.6 KB · Views: 168
  • cockpit 004 - resized.jpg
    cockpit 004 - resized.jpg
    104.7 KB · Views: 163
  • axles 001 - resized.jpg
    axles 001 - resized.jpg
    127.1 KB · Views: 159

Users who are viewing this thread

Back