No. 198 Squadron Hawker Typhoon Mk. 1B (1 Viewer)

Ad: This forum contains affiliate links to products on Amazon and eBay. More information in Terms and rules

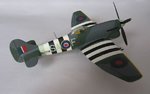
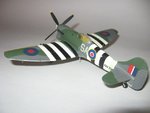
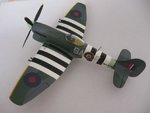
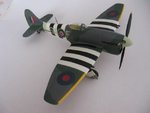
Cheers Brother, appreciated! Did a tad more today....

DSCF0001-80.jpg


DSCF0003-75.jpg
 
Cheers H! :lol:

Done the lower camouflage....

DSCF0013-28.jpg


Now, I guess that paint the upper camouflage and later the white for the D-day stripes is the way to go (or is it?), but what is the best way to go when painting and masking the fuselage stripes and codes??

DSCF0011-33.jpg
 
Last edited:
Good going Jan

Never done that scheme before, but i would go camo first then stripes. ( thats my way of thinking )
 
That's way you should have applied a light grey primer overal firstly. Then painted with the white at areas where these strips should be. The next step should be masking edges and whole white areas and applying the main camo spots. Later , masking should be removed and the white areas should be masked for applying of the black stripes.
 
They've been kind enough to supply the black stripes Dr Wojtek.... :lol: I think that is what I'll do, paint the white and then main camouflage. :D

Cheers old chap!
 
....... what is the best way to go when painting and masking the fuselage stripes and codes??

DSCF0011-33.jpg

The only problem Jan is that the stripes don't extend under the some of the codes. The main camo is visible there.

I don't know if it's the best way, but I would procede as follows:

Spray the entire fuselage Camo scheme and let dry
Mask off the areas for the "B" on the port side and the "ZY" on the starboard side (see below)
Mask off the fuselage from the rear to the aft edge of the trailing white stripe and from the forward edge of where the leading white stripe ends to the front.
Spray the area white and let dry
Mask off the white area except for the area where you want the black stripes and spray black - Voila! Finished except for removing all of the masks

To make the masks for the B and ZY codes, simply lay a piece of transparent graph paper over the decals and mark off an area on the graph paper slightly larger then the extent of the letters. Using that as a guide, cover that area with Tamiya tape and then cut to size. You can pull off the graph paper to leave the tacky back side exposed and then apply. Frisket paper might work as well but it tends to be more tacky and there is greater chance of pulling paint off with it. Using graph paper provides some reference lines so you can make sure you get the masks squared.

The two tricky parts are masking off the code areas and making sure that you get the stripes vertical and reasonably uniform in widthl.

Probably more detail than you wanted or needed. :)
 
Last edited:
It is quite good way Dwight. Similar to the real way of painting of course. But it should be easier to paint the strips firstly and then the main camo spots.These background "squares" for B and ZX code letters can be painted at the end.Masking of them and airbrushing should be dead easy I think.
 
Well, I've painted it all white now....:lol: (d*mn) Cheers for your suggestions chaps!

DSCF0001-81.jpg


DSCF0003-76.jpg


Think that I'll save those wee squares to later. One more layer to get it real white! :lol:
 
Cheers H! 'Someone' once told me, running out of white paint is like running out of glue......or was it beer or whisky? Hmmmmm....

Terry..!?
 
Looking good old boy, and both methods for the stripes are equally effective - depends on personal choice. But, as you're doing a 198 Sqn machine, you won't have the problem of masking the areas where the code letters go - they were painted over, hence the small 'repeater' letters on fin and nose! (Who hasn't read all the stuff I sent him then?!!)
Personally, I'd avoid the decals for the black stripes. Apart from being a pain to align and settle correctly, they'll look too neat. A little 'rough at the edges but not too much' appearance is what you ought to aim for, and even painting freehand, without masks, should give a good result. Use a paintbrush of course, not the squirty air thingy!
 
I didn't have any problems with airbrushing these strips on my Tempest of 1/72 scale. Of course I used the way of painting depicted by me above. The cockpit conopy was warm shaped with a wooden former.
 

Attachments

  • Tempest_MkV_7.jpg
    Tempest_MkV_7.jpg
    34.7 KB · Views: 95
  • Tempest_MkV_5.JPG
    Tempest_MkV_5.JPG
    30.7 KB · Views: 118
  • Tempest_MkV_2.JPG
    Tempest_MkV_2.JPG
    32.3 KB · Views: 96
  • Tempest_MkV_1.JPG
    Tempest_MkV_1.JPG
    29.9 KB · Views: 113
Last edited:
Looking good old boy, and both methods for the stripes are equally effective - depends on personal choice. But, as you're doing a 198 Sqn machine, you won't have the problem of masking the areas where the code letters go - they were painted over, hence the small 'repeater' letters on fin and nose! (Who hasn't read all the stuff I sent him then?!!)
Personally, I'd avoid the decals for the black stripes. Apart from being a pain to align and settle correctly, they'll look too neat. A little 'rough at the edges but not too much' appearance is what you ought to aim for, and even painting freehand, without masks, should give a good result. Use a paintbrush of course, not the squirty air thingy!

Had to go back re-read the email old boy! :oops: Have I understood it correctly, in thinking that the TP code was covered on one side by the D-day stripes, and the individual aircraft code was covered by the same on the other side? Been staring at the kit instructions, my excuse to forgetting this and to which I stick to! :lol:

Cheers guys and nice Tempest Wojtek!
 

Users who are viewing this thread

Back