- Thread starter
- #81
Navigation
Install the app
How to install the app on iOS
Follow along with the video below to see how to install our site as a web app on your home screen.
Note: This feature may not be available in some browsers.
More options
You are using an out of date browser. It may not display this or other websites correctly.
You should upgrade or use an alternative browser.
You should upgrade or use an alternative browser.
**** DONE: 1/48 Yak-1b Lilya Litviak, the VVS - Aircraft of the Aces GB.
- Thread starter N4521U
- Start date
Ad: This forum contains affiliate links to products on Amazon and eBay. More information in Terms and rules
More options
Who Replied?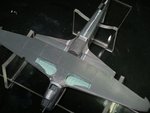
nice progress Bill
brucejscott
Staff Sergeant
It's looking good so far Bill and no I don't think it is just you. My father built this kit a while back. He got so frustrated it ended up in the circular metal file. Steady on, your doing good work.
Some models are mean't to test you Bill....this might be one of them....
- Thread starter
- #85
N4521U
Plastic Pirate
It's looking good so far Bill and no I don't think it is just you. My father built this kit a while back. He got so frustrated it ended up in the circular metal file. Steady on, your doing good work.
That's good to know, or is it?????? My Brewster seems to another test! But I will not give up on Lilya! I am finishing off all the filling and then will go for the wing root inlets.
Crimea_River
Marshal
It's you Bill.
Just kidding! Wayne said it right. They key is how much time you spend on attending to those issues. I think it will truly pay off in the end and you'll be glad you did it.
Just kidding! Wayne said it right. They key is how much time you spend on attending to those issues. I think it will truly pay off in the end and you'll be glad you did it.
Airframes
Benevolens Magister
You're doing well Bill. If you think that's bad, have a look at the Buccaneer I did - it's a minefield of gaps !
- Thread starter
- #89
N4521U
Plastic Pirate
brucejscott
Staff Sergeant
Oh, it works. Just remember to smooth it with a wet finger or tools before it cures. Myself, for wing roots, I always like filling with "Green Stuff" and then smoothing and blending with acetone while it is still wet.
You're doin' good Bill, keep at it mate!
- Thread starter
- #92
N4521U
Plastic Pirate
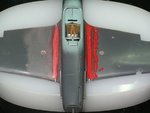
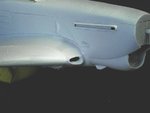
H3LL, that didn't work. As the package says, the colors are so alike it's difficult to see if it is mixed thoroughly or not, mine was more on the Not side. It never hardened. So I have cut it all off and will try again. I think these inlets are s pretty obvious part of the Look of the plane, so I do have to get them right as I can. There is a little fin from the bottom that looks like it directs sir into them as well.
More work.
More work.
Airframes
Benevolens Magister
A little trick for Milliput Bill, preferably the grey/yellow version, not the white (the latter for repairing crockery etc.)
Cut equal, small amounts off each 'stick'. Roll these into individual 'snakes', keeping them pliable and warm as you knead them. Once each 'snake' is soft and pliable, plait both 'snakes' together, then roll into a ball, mixing the colours together. Keep kneading, rolling, pressing, rolling etc, and the colours should blend and the material become softer. Then it's ready to use.
However, depending on ambient temperature, and the amount being used, it can take quite some time (in hours) to set hard.
I've only ever used the white version once, and found it seemed to take forever to harden, compared to the grey/yellow.
Hope this helps.
- Thread starter
- #94
N4521U
Plastic Pirate
Thanks for the heads up on this one.
I am using a piece about the size of a pencil eraser.
What I did this time was to flatten them as thin as I could. Pressed them together and crushed them as I folded them. Did thid till my fingers were sore. Pressed the blob in place and using round rod PVC sticks, keeping them wet I shaped the intake. I've just left it to dry, won't be touching it for another 13 hours or so. I bl**dy well hope it works this time.
Peebs
Senior Airman
Keep at it Bill, doing a great job.
I've had no problem with they grey/yellow milliput, as suggested here I always wet my fingers and smooth it down into the gaps as much as possible
I've had no problem with they grey/yellow milliput, as suggested here I always wet my fingers and smooth it down into the gaps as much as possible
Lucky13
Forum Mascot
Looking great mate!
- Thread starter
- #97
N4521U
Plastic Pirate
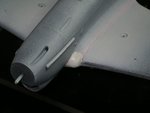
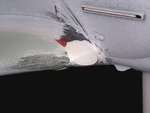
Well that seemed to work. It didn't set "rock hard" as advertised but nice and workable with the file. I just got some tiny steel dremmel tools, the itty bitty round one and ground out the hole easily.
Now............ the other side to match!!!!!!!!!! argh
Now............ the other side to match!!!!!!!!!! argh
Attachments
brucejscott
Staff Sergeant
Looks good. Nice job.
")
Crimea_River
Marshal
Excellent.
Users who are viewing this thread
Total: 1 (members: 0, guests: 1)