**** DONE 1/48 Tamiya Me 262 A-2 Heavy Hitters Group Build (1 Viewer)

Ad: This forum contains affiliate links to products on Amazon and eBay. More information in Terms and rules

Didn't get a lot done this weekend. Working on some kitchen drawers mostly but I did manage ot finish off the cockpit interior.

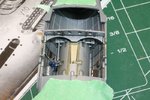
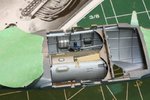
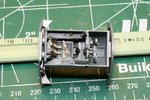
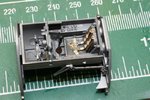
Pics 1 and 2 show the finished cockpit. The stick and instrument panel are now in and the obligatory Eduard seatbelts installed. The gunsight is left off for now.

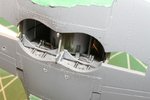
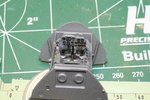
Pic 3 is the finished intrument panel. A bit more touch up was done since the earlier photos especially a little more red and yellow around some of the dials.

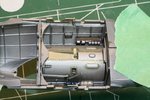
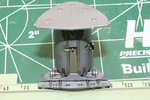
Pic 4 shows a little more work on the underside of the cockpit tub. My Squadron Me-262 Walkaround shows this area quite nicely and there are distinct yellowish areas around the seams of the aluminum. Probably some kind of sealant. I mixed a bit of yellow, silver, and black to replicate this and am reasonably pleased with the results. There are a lot of wiring harnesses in this area and I'm debating whether to add these. More later!
 

Attachments

  • 091115 Cockpit 1.jpg
    091115 Cockpit 1.jpg
    107.4 KB · Views: 117
  • 091115 Cockpit 2.jpg
    091115 Cockpit 2.jpg
    112.3 KB · Views: 115
  • 091115 Inst Panel.jpg
    091115 Inst Panel.jpg
    93.1 KB · Views: 115
  • 091115 Cockpit Tub.jpg
    091115 Cockpit Tub.jpg
    94.8 KB · Views: 114
Last edited:
You're welcome Vic and thanks Wayne. great shots! I sure owe you now after that mix-up on the Dora!

Still no real photo evidence to back up David Brown' statement that the "It is highly probably that the colour 81 would also appear on the wing upper surfaces in a similar pattern to that on the fuselage sides and top".

Here is the clearer shot of White Y same source as above...

In the previous images, take a close look at the top of the engine nacelles...the DARK Green 'squiggles' over the lighter colour..the tonal difference between the two seems too much to be 81/82?.....just my observational opinion from a NOT a colour expert of black and white photos!!

Yet when you view the full shot from the side the tonal difference is much less......
 

Attachments

  • 9K YH_7621aaa.JPG
    9K YH_7621aaa.JPG
    46.9 KB · Views: 101
Thanks guys. Wayne, thanks for remembering that shot and for your valuable observations. I'm certainly no expert either at deciphering B&W photos and would not be able to say whether the colours were 81 over 74/75 or 83 over 82. You can clearly see the red bomb angle lines on the canopy screen though. Just noticed that!

Also just rememebered that there's an emergency canopy release handle on the starboard side of the cockpit that I haven't added yet.
 
found these in Kampfflieger vol.4 - Bombers of the Luftwaffe, Summer 1943 - May 1945.
thought the profile of "white B" might help with colours
 

Attachments

  • Project18.jpg
    Project18.jpg
    83.1 KB · Views: 147
  • Project17.jpg
    Project17.jpg
    53.2 KB · Views: 143
  • Project16.jpg
    Project16.jpg
    56.8 KB · Views: 164
  • Project15.jpg
    Project15.jpg
    87.8 KB · Views: 152
Hey Karl, thanks for those! Some interesting tidbits here for my build.

White B is one of the decal options provided with the Tamiya kit. The profiles of this plane and others in KG 51 continue to point to the use of 81/82 on the topsides. White B had a mottled camo whereas White Y had squiggles, as do others in the photos above but these appear to be thicker than ones in the White Y photos posted earlier. Also note that the cannon port on white Y doesn't have the white outline as many of the other birds in the unit. I chose White Y to challenge myself with the camo. Could turn out to be a disaster but what the heck?

The Kettenkrad in the photo has just the simple base sand-yellow finish. I was planning on adding a bit of green or brown to mine for interest and may yet do so. Artisitic license I guess! Thanks again for the post. I appreciate it.
 
A bit of progress but not much. Working long hours this week.

This series of photos shows work completed on the fuselage sidewalls and the tub, fuselage halves, and wing lower portion dryfitted. Fuselage sidewalls were painted alumimum Tnd a thin black wash applied to highlight the ribs. The dark gray electrical boxes were enhanced with plastic card to make them deeper as the ones supplied with the kit were molded intot he wall and were quite flat.

I did this dryfit to judge how much additional detailing I should do in here. I've decided to add wiring harnesses and some missing control linkages where these can be seen. There's actually quite a bit visible through the well openings so the efforts shouldn't go to waste.

I'm bugged a little by the thickness of the rounded flanges and, if the mood hits me, I may cut these off and replace them with plastic card as these were just thin sheet metal. Shouldn't be hard to do.

Cheers and thanks for checking in.
 

Attachments

  • 091117 Tub Dry Fit.jpg
    091117 Tub Dry Fit.jpg
    99.8 KB · Views: 123
  • 091117 Tub Dryfit Port.jpg
    091117 Tub Dryfit Port.jpg
    103.5 KB · Views: 117
  • 091117 Tub Dryfit Stbd.jpg
    091117 Tub Dryfit Stbd.jpg
    105.9 KB · Views: 116
  • 091117 Tub Dryfit with Wing.jpg
    091117 Tub Dryfit with Wing.jpg
    78.1 KB · Views: 112

Users who are viewing this thread

Back