- Thread starter
- #101
Navigation
Install the app
How to install the app on iOS
Follow along with the video below to see how to install our site as a web app on your home screen.
Note: This feature may not be available in some browsers.
More options
You are using an out of date browser. It may not display this or other websites correctly.
You should upgrade or use an alternative browser.
You should upgrade or use an alternative browser.
**** DONE 1/48 Tamiya Me 262 A-2 Heavy Hitters Group Build
- Thread starter Crimea_River
- Start date
Ad: This forum contains affiliate links to products on Amazon and eBay. More information in Terms and rules
More options
Who Replied?B-17engineer
Colonel
Andy she looks beautiful!
- Thread starter
- #103
Crimea_River
Marshal
Thanks H. Get back to work on that P40 now!
B-17engineer
Colonel
- Thread starter
- #105
Crimea_River
Marshal
Paint your Stuka!
B-17engineer
Colonel
We are fixing a large gap and I need to find some extra plastic to make the 'filling.' 
- Thread starter
- #107
Crimea_River
Marshal
More progress.
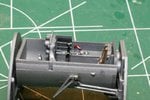
Photo 1 shows a bit more work on the cockpit. The forgotten emergency bomb release handle was scratch built, painted red, lettering added with white paint and glued to the stbd wall. A bit more detail was picked out on the stick as well.
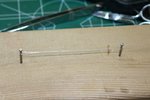
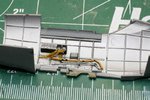
I also tackled some wiring harnesses today with a new technique. The problem I saw was that a single wire depicting individual wires didn't look realistic to me. But how to find wire small enough for individual wires? Thought about stretched sprue but I figured it would be too brittle at such fine diameter so I went and bought some 3 lb fishing line for 2 bucks and set up a jig (photo 2) and wound some turns around the nails. Then with thin strips of scotch tape, I pulled the wires together at about 1 inch intervals and then placed a drop of superglue in each section. The result was a very stiff but realistic looking (in my opinion) bundle. However, it was a bit of a b!tch to work with, being quite stiff.
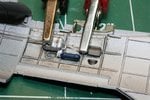
Photo 3 shows how I ended up bending the bundle to hold it in place for glue. Oh and by the way, I cut the boot off the compressed air bottle as the references I have show a simple cylindrical bottle with no boot and it was getting in the way of the harness anyway!
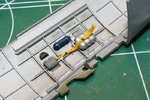
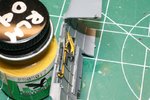
Photo 4 shows the completed harness on the port (correction) side finish painted. The bundle comes out of the electrical box and is supposed to tuck under the rib and out the other side. The rib isn't very deep though so it looks a bit contrived. Oh well.... The free end will be hidden behind the wing spar so no need to connect it to anything.
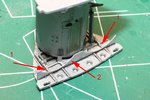
The other day, I mentioned I was thinking about replacing the thick, contoured plates along the spar with thin plastic card. I decided to use my Dremel tool to thin the edge instead. Arrow 2 in the final photo shows the result. The thinner plate also made visible the free end of the molded hydraulic lines on the bulkhead which just stopped behind what used to be invisible. So I extended the lines with small lengths of stretched sprue (Arrows 1). I should have cleaned off the plastic dust from the grinding. Amazing what shows up in photos that you dion't see with the naked eye!
More to come - long way to go!
Attachments
Last edited:
109ROAMING
2nd Lieutenant
Dam thats good work!
Vic Balshaw
Major General
That's some model you have there Andy and what fantastic workmanship.
I used copper wire either from a craft shop selling jewellery making bits or from a stripped cable and stretched out on a piece of plastic and glued side by side at intervals. Same principle with same result really. I found that though glued it remained quite pliable.


I used copper wire either from a craft shop selling jewellery making bits or from a stripped cable and stretched out on a piece of plastic and glued side by side at intervals. Same principle with same result really. I found that though glued it remained quite pliable.


said it once but will repeat myself, fantastic C.R
Nicely done Andy!
lesofprimus
Brigadier General
Looks good Andy..
- Thread starter
- #113
Crimea_River
Marshal
Thanks everyone! Vic, that sounds like the perfect solution but I have not yet found copper wire small enough to get down to 1/48 level for this. It must exist though and I'll keep looking. I have a spool of 30 ga copper that I like to work with but it looked too thick for this application. It's 0.2mm in diameter according to my calipers and the fishing line is about half that.
I actually have some copper wire that is TOO thin. I found it sandwiched between the plastic faces of a security access card but it's in a coil that I can't saparate. Almost like human hair though.
I actually have some copper wire that is TOO thin. I found it sandwiched between the plastic faces of a security access card but it's in a coil that I can't saparate. Almost like human hair though.
Airframes
Benevolens Magister
Great work there Andy. I like the wiring bundle, looks the biz, and should look just right when looking doen into the cockpit. Vic is right about the copper wire - the stuff used for jewellery etc is as thin as the fishing line, and has the advantage of remaining pliable once glued. Yiou should be able to get some from craft shops; sometimes it's in kits with other bits and pieces, some of which can be uaseful for other modelling needs, whilst the rest are - well, bin 'em!!
You can also find short lengths on old PCB pieces from transistor radios etc, and slightly heavier gauge from the multi-core telephone extension cables can be useful. the latter have various coloured sleeves, which can be handy, but when the sleeve is stripped off, the wire itself is very fine and pliable.
You can also find short lengths on old PCB pieces from transistor radios etc, and slightly heavier gauge from the multi-core telephone extension cables can be useful. the latter have various coloured sleeves, which can be handy, but when the sleeve is stripped off, the wire itself is very fine and pliable.
- Thread starter
- #115
Crimea_River
Marshal
Great advice Terry, thanks. I'll check again add the local craft store but the service there sucked when I asked about it. If you're not standing in the right aisle, the hired help can't point you to where to look. And the store is the size of a soccer field.
I have quite a collection of wire for modeling but nothing in copper that was 0.1mm in dia like this fishing wire. Telephone wire, at least in my part of the planet, measures out to 0.5mm without the insulation and is too thick for this. The 30ga copper wire is 0.2mm, also a bit clunky. I will try to look again for copper wire that's equivalent to the fishing line as I agree that this would be the ideal material.
By the way, this won't be seen from the cockpit as it's between the tub and outer skin. However, it's highly visible from the wheel wells.
Airframes
Benevolens Magister
Oops! My mistake! But it will be seen, and will look good I think! If you can't get any wire, let me know and I'll have a look in the art shop near me - they seem to have everything! If they have anything suitable, I can send you some. I need to re-stock myself, so I'll be visiting there soon. Another unusual source for some wiring are the bristles from paint brushes - the household variety, for painting doors etc. Some of these can be used quite effectively, although they are of course only in relatively short lengths of about four or five inches. The synthetic ones work quite well, and can also be used for making 'clumps' of long grass for dioramas, vignettes etc.
- Thread starter
- #117
Crimea_River
Marshal
Wife's gone out and will stop by the art store for me now. Didn't think of the bristle brushes but will consider, thanks.
vikingBerserker
Lieutenant General
Superb job Andy!
- Thread starter
- #119
Crimea_River
Marshal
Well my wife returned empty handed. The smallest wire they sell at the craft store is about 28 AWG. BUT... I did find some speaker wire in the basement and, lo and behold, it's about the same diameter as the fishing wire. So I tackled (oops, sorry about the pun) the starboard side which has a lot more going on.
The two pictures below show the completed details on the starboard side. I said in the previous post that the first wires I did then were on the starboard side but it's actually the port side. Above post is fixed. The main harness in the photos below uses the speaker wires and those connecting to the junction boxes are fishing wire from the strand I made the other day. All wires were painted RLM 04 yellow, then a thin wash of black was applied to tone it down and bring out the strands more. Also added are what I believe to be 2 hydraulic lines just below the harness.
That completes what I can do in the wheel wells until the tub is glued in. There will be more harnesses connecting to the tub so the fun never stops.
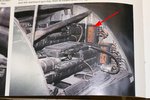
It will be on to the gun bay next so I have a question (see the last photo of a page from Squadron/Signal Me 262 Walk Around). The photo shows the usual arrangement with 2 MK 108's on each side. There's an electrical box for each gun (arrow) and both are molded into the model bulkhead on my kit. However, the Me-262 A-2a dispensed with the upper cannons to save weight so I'm wondering if the boxes were also removed? I'm inclined to leave them in but does anyone know what was done or have photos/references showing the 2 gun arrangement?
Thanks for your continued interest.
Attachments
Heinz
Captain
Looks awesome mate! 
Users who are viewing this thread
Total: 1 (members: 0, guests: 1)

