**** DONE 1/48 Tamiya Me 262 A-2 Heavy Hitters Group Build

Ad: This forum contains affiliate links to products on Amazon and eBay. More information in Terms and rules

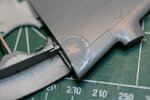
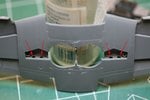
There's a little known and, until now, unpublished fact that some Lutwaffe pilots eschewed the pratice of painting personal markings on their aircraft in favour of adorning prominent parts of their mounts with large representations of their finger prints. Such unusual but highly personal depictions are believed to have been achieved using paper mache, plaster of paris, or, if pressed, local mud. Unfortunately, no known photos exist showing examples of this rare practice so I was forced to used a little artistic license to interpret the few verbal references about this practice to come up with my own version as shown in Photo 1. This difficult effect was achieved by holding the upper wing wing section with just the right amount of pressure from my left thumb and carefully applying Ambroid Pro-Weld liquid glue to the wing leading edge in such a precisely measured quantity to enable some of the glue to run down the wing from the leading edge seam to my thumb to form the said feature. I'm very pleased with my first attempt at replicating this effect and look forward to perfecting the technique on many future kits. 8-[

But seriously....sanding/surfacing is already underway.:oops:

Other progress over the last couple of days:

Photo 2 shows lightening holes drilled into the rear wall of the main wheel wells. This was a bit tricky as the holes were elongated. I used a reamer bit on my Dremel tool but this bit tends to wander so it has to be carefully controlled. The holes aren't 100% even but OK for what I wanted to achieve. The palstic behind the holes was thinned to resemble sheet metal as much as possible.

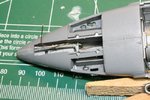
Photo 3 shows some detail work in the wheel wells, adding various hydraulic lines, the stiffening rib, and wiring per my Me-262 Walkaround reference. This area is directly underneath the gun bay.

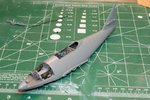
Photo 4: The fuselage halves are glued together with the cockpit tub and gun bay/nose wheel assembly installed. The latter is an interesting piece of of kit. It's made of metal to act as weight to keep the model from tipping and the fit is quite amazing in this area. No problems at all here and there will be minimal sanding/filling along the entire seam.

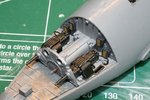
Photo 5 is a close-up of the gun bay. The only additions since the last shot of this area are the two pneumatic hoses to the guns and a bit of simulated lettering on the electrical boxes. There's a bit more electrical wiring to be added and I'll want to hide the dorky looking pin holes for the two cannons that are left off and make something that looks a little more convincing for a gun mount.

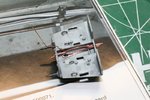
Photo 6 is a close-up of the painted nose wheel well. The retraction jack is pinched in between the plastic gun bay and the metal part and is free to move. It had to be installed now and will be rotated to marry up with the nose wheel once it is put in at a much later stage. The copper wire that's sticking out will run along the jack and connect to the end of the cylinder. It could be a hydraulic line but photo references seem to show two small wires sticking out the very end so this could in fact be a wiring harness carrying a signal for the the landing gear being fully retracted. The distinction is not significant on the model, as hydrulic lines, if they run on the other side of the cylinder, wouldn't be seen anyway. I still have to run the brake line to the nose wheel though and this will be a later addition.

That's it for now. Don't be like me and watch that liquid glue! To all my friends south of the 49th, have a great Thanksgiving weekend!
 

Attachments

  • 091125 Finger Print.jpg
    091125 Finger Print.jpg
    73.5 KB · Views: 100
  • 091125 Wheel Well Holes.jpg
    091125 Wheel Well Holes.jpg
    66.5 KB · Views: 109
  • 091125 Front Wheel Well Unpainted.jpg
    091125 Front Wheel Well Unpainted.jpg
    107.9 KB · Views: 100
  • 091125 Front Wheel Well Painted.jpg
    091125 Front Wheel Well Painted.jpg
    109.8 KB · Views: 109
  • 091125 Gun Bay.jpg
    091125 Gun Bay.jpg
    105.9 KB · Views: 103
  • 091125 Fuselage Together.jpg
    091125 Fuselage Together.jpg
    115.9 KB · Views: 102
happy0034.gif


I'm impressed Andy, this is really fine work and the thumb print looks great and you should be pleased with it.

Do you intend to leave the gun housings open, it would be such a shame to hide all this magnificent detail.
:hotsun: :hotsun:
 
A smidge more progress. Busy at work working OT Saturday so not much done.

Photo 1. Yet more stuff being added to the wheel wells before the wing goes on. Additional wiring harnesses added from the cockpit tub to the bundles on the sidewall (arrow 1). These connected the various electrics from the breaker panel inside the pit to the systems on the plane. Arrow 2 is the bell crank for the aileron and elevator controls. This was cut from plastic card. The stretched sprue linkage toward the rear goes to another scratch built crank, just visible under the metal panel, to which more linkages will be connected for the rudder and elevators (not built yet). At the stick (back at arrow 2), there's a linkage to be added that will follow the recess in the tub toward the starboard side to a crank that's molded to the wing spar. This link will get added once the wing is in place. The crank and links are not yet painted. There's a mess of hydraulic tubing to be added and arrow 3 shows the start of that mess, not all of which will be replicated. There will be just enough to represent the spaghetti in this area.

Photo 2 shows the wing and engines assembled, ready to fit to the fuselage. The engine fit to the wings is absolutely perfect - typical Tamiya. I don't think I'll need any filler here, just a bit of light filing and polish sanding. You see where I've smoothed over the "imprintus digitalus" Terry!

For interest, I've included pics of my references from the excellent Squadron Me 262 Walkaround book showing the details in the wheel wells.

Til next time!
 

Attachments

  • Squadron Reference 2.jpg
    Squadron Reference 2.jpg
    97 KB · Views: 104
  • 091128 More Tub Details.jpg
    091128 More Tub Details.jpg
    105 KB · Views: 102
  • 091128 Wings and Engines.jpg
    091128 Wings and Engines.jpg
    105.1 KB · Views: 100
  • Squadron Reference 1.jpg
    Squadron Reference 1.jpg
    105.4 KB · Views: 106
Last edited:

Users who are viewing this thread

Back