***** DONE -Nakajima A6M2-N "Rufe" of the Yokohama Kokutai Group Build

Ad: This forum contains affiliate links to products on Amazon and eBay. More information in Terms and rules

here you go Charles a better shot of the dolly, found some colour profiles but no colour pictures, ill post the profile if you want me to !

Thanks Rochie. I'd love to have the color profiles, but send them to my email address. Just bring up
my user profile and you can send them that way. Thanks.

Charles
 
Charles,

I built this particular balsa kit back in college (and still have it!) and though I doubt you need them, would like to offer you some tips for the build if I can. First I built it without applying the tissue so you can still see the balsa wood structure. I was and still am too scared to attempt it! Anyway, first tip, take the scale drawing that someone included above and scale the tail up to the size of the kit instructions. Use the fuselage height just before the tail as you guide. No need to be too precise here I would think. After you do this you will find by comparing to the kit instructions the vertical tail is quite different BUT the kit supplied pieces can be used to form the new vertical tail with very little problem. Also use the scaled up technical drawings to build the shallow ventral find on the tail as well (out of the tons of scrap balsa you will have) and the hand hold in this area can also be made at this point from a slightly re-bent staple.

Scrapping the kit "toy" prop is a good idea at it will likely hit the float anyway as mine did. However the mounting of the central float is plenty stable and strong. I imagine the two balsa wood pieces you are referring to are the rear central pontoon stabilizers. Regardless, I have still not glued these on and have simply relied on the main brace towards the front to keep the central float attached…without glue for all these many years. I believe my instructions advised that I reinforce the leading edge with heave cage wire, which I did to all three float struts (center and two wing ones), and I wonder if that is still included in the instructions. I would suggest doing it either way as it really keeps those parts nice and strong. Also, the "box structure" that you will build into the bottom of the wing to accept the large main central pontoon brace should be built this the actual brace sandwiched between the two lateral pieces in the wing, but not glued…yet. This will allow you to easily attach the pontoon at a later time and will assure it won't flop from side to side and that it will stay, as in my case, without glue. (Hey you may have to transport it when you win the lottery and move to that mansion/aviation museum.)

Last but not least, a small right angle triangle will come in handy and will help you keep everything "trued-up" as you glue everything together. I know this is a newbie suggestion, so don't take offence if you do this already. I', just telling you what helped me. I can E-mail you pictures of my dusty version if you wish.

Regards Good Luck, Capt. Vick
 
Thanks for the advice, Capt. Vick. However, I have already fabricated a main float brace from solid 3/8" sheet balsa.
The sanding sealer is drying as we speak. I've been building stick paper airplanes for a long time, but I am by no
means the expert. I never did learn how to weather an airplane, altho I think I am quite good at seeing beyond
the plans and doing a little fabricating. I did notice a difference in the height of the rudder on the model and the real
"Rufe". Have penciled in the true shape, and will modify that when I get that far.

I worked on both the fuselage and the main float, today. The float is ready to be sanded so it can be covered. I want
to install my main float brace into it first. I'm still putting stringers on the fuselage. Pic's on or before the week-end.

I'm still in need of color pic's....

Charles
 
Mr. C, you know that I have been your strongest fan for your balsa modeling. Looking forward to this as it is a modeling realm I have never attempted.

Have you thought about scratch building a cockpit interior?
 
Another profile I have found on my HDD. Source unknown.
 

Attachments

  • rufe1.jpg
    rufe1.jpg
    41 KB · Views: 390
Mr. C, you know that I have been your strongest fan for your balsa modeling. Looking forward to this as it is a modeling realm I have never attempted.

Have you thought about scratch building a cockpit interior?

Thanks for the kind words, Matt.

Yes, I have thought about a cockpit interior. However, there is really no room. The rubber band goes
right thru the center which would really complicate matters. By the time I "boxed off" the interior, there
would be hardly any room left. However, I have not said no, to a cockpit.

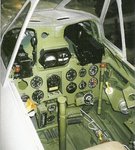
Anybody got pic's of a Zero interior ??? I'm sure the Rufe is the same...

Charles
 
here is some nice box art of 2 Rufe's I have....
 

Attachments

  • A6M2-N_NI-118_Box Top_a.JPG
    A6M2-N_NI-118_Box Top_a.JPG
    43.6 KB · Views: 141
  • A6M2-N_934-06_Box Top_a.JPG
    A6M2-N_934-06_Box Top_a.JPG
    43.2 KB · Views: 153
Hi Charles,

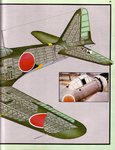
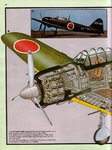
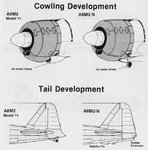
From the research Ive done on the zero Ive found that the A6M2-N is bascially the same as a A6M2 zero with a few changes. The main change of coarse being the addition of floats. One major change being the extention of the rudder and addition of stablizer fine, the other being the movement of the oil cooler. All A6M2-N zero's where manufactured by the Nakajuma Aircraft Company. On December 8,1941 the first converstion began flight tests. I believe so far only two float plane aces have surfaced. Warrant Officer Kiyomi Katsuki who ended the war with 16 kills. 7 of them in seaplanes and the other is Chief Petty Officer Eioku Matsunaga.

Hope it helps
Paul
 

Attachments

  • 1.JPG
    1.JPG
    51.2 KB · Views: 277
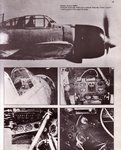
Here is a picture of the c0ck pit of an A6M2 zero in color. Hope it helps.
 

Attachments

  • 1.JPG
    1.JPG
    127.6 KB · Views: 1,269
Last edited by a moderator:
Lovely work so far, I'll be really interested in watching this come together. 8)

I was at the LHS today, they have a few Guillows P-40's, they're €39.99!! You got this one for $11.50. Just checked ebay and the P-40's are going for similar prices to what you paid. And he wonders why no one is buying anything in his shop!
 
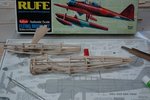
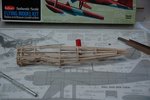
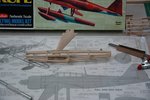
Here's where we are at the end of Friday. The construction of the fuselage and the main float is finished. Both have
to be sanded, then three coats of clear dope [sanding in between coats], then they can be covered. I have fabricated
a main float support, and it's dry fitted to the float.

Thanks to all of you for the pic's of the c0ckpit and to Paul for the engine and tail details. Hope to start covering the
fuselage and main float tomorrow, while constructing the tail sections.

Charles
 

Attachments

  • Build1.JPG
    Build1.JPG
    80.8 KB · Views: 203
  • Build2.JPG
    Build2.JPG
    72.8 KB · Views: 154
  • Build3.JPG
    Build3.JPG
    76.5 KB · Views: 213
Some nice stuff Charles always like seeing a different medium.Cheers Kevin
 

Users who are viewing this thread

Back