**** DONE 1/48 Tamiya Me 262 A-2 Heavy Hitters Group Build

Ad: This forum contains affiliate links to products on Amazon and eBay. More information in Terms and rules

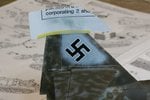
Thanks guys. Repairs proceeding nicely so far. I chased the flaking paint almost over the whole fine trying to find an edge to sand and feather in - not good. So I resorted to creating a bonded edge using lacquer thinner which I know dissolves all paint that it's applied to. I softened the edges and pulled them into the unpainted patch. As a bonus, I noted that this stuff also softened the plastic a bit so it gave a surface with good bite. A coat of RLM 76 has been applied at the patch and the new swastika will go on later today. Then its the 81 squiggles again - argh!

Pics to come.
 
Repairs complete.

First shot shows the repaired area sprayed with RLM 76 and the new decal applied. You can still just see the boundary of where the paint chipped away below and to the left of the swastika. The mask on the white tip was CAREFULLY applied with a very thin strip of Tamiya tape barely tacked on holding scrap paper as a mask.

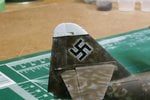
Final shot show the finished fin with the RLM 81 applied (it was quite heavy on the tail surface per actual photos), the mask removed, and the black stripe decal applied. This area has received a good douse of dull coat and will cure for a couple of days.

Off to Lake Louise skiing tomorrow so will check in Wednesday. Thanks all for your tips and for your continued interest.
 

Attachments

  • 091228 Fin Repairs Progress.jpg
    091228 Fin Repairs Progress.jpg
    77.3 KB · Views: 110
  • 091228 Fin Repair Done.jpg
    091228 Fin Repair Done.jpg
    79.7 KB · Views: 127
Good fix Andy.

I've never had the problems you are experiencing...touch wood (head):D

While I've never washed a model, I always run 800 to 1200 grade sandpaper over most of the model during the sanding stages, especially to areas that may require extra attention, such as fuselage for bands, tips of tails and wings for recognition markings etc. These colours are always applied first and left a few days to fully cure seeing as though they are mostly white, yellow, red, blue...then masked with Tamiya tape and camo colours then applied all with Tamiya acrylics.
Panel lines, pastels follow then Gloss, decals, gloss and then flat coat to suit.

Have always avoided anything that can cause a possible problem, like masking over multiple paint and clear layers or decals.....
 
Great job on the correction mate. Have a good ski trip - lucky b*gg*er!! Two things i miss because of this stupid Arthritis - playing guitar and skiing.
 
Thanks everyone. Wayne, good advice indeed. Never thought of sanding the whole model but might do so if I coninue woth acrylics. I actually had intended to keep the white precoat and mask off the tip of the nose and fin for the rest of the paint job. Not sure why I didn't follow through on that plan.

So now the wheels have gone on and the next step is to complete the hydraulics for the brake lines and actuator cylinders over the next couple of days. Then it's painting and attaching the bombs, adding the fiddly bits, and finishing the Kettenkrad.
 

Users who are viewing this thread

Back